Next we’ll edit a special file on your desktop wallet named masternode.conf and “Start” your MN on the $Pac network.
A quick reminder of where we are below:
Steps to create your Master Node
-
1. Getting Ready -
2. Configure your desktop wallet -
. Install Masternode server on your VPS - 4. Start your Masternode
- 5. Monitor your Masternode and collect rewards
Edit Masternode Configuration
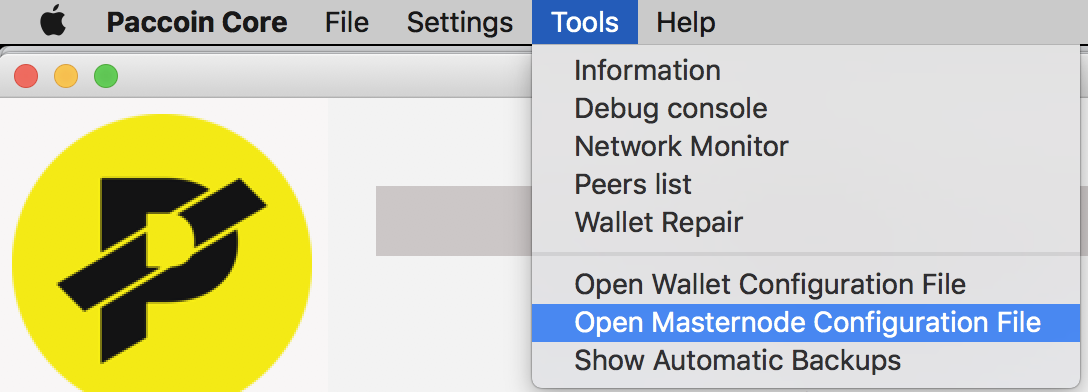
On your cold (desktop) wallet installation, there is a special file called “masternode.conf” which contains information needed to properly remote start and broadcast your new MN to the $Pac network. To access this file, from the main toolbar on your wallet, go to Tools -> Open Masternode Configuration File:
This will open the file masternode.conf in your text editor. The first 2 lines of the file are commented out using the # character and show the format needed. We’ll need to enter the following 4 pieces of information that you should already have in your text editor:
(1). alias - this is the unique name for your Masternode. If you followed the recommended naming convention (MN1, MN2, etc), this is the same name found in step 9 of Install Server: Set Hostname and Deploy.
(2). IP:port - this is the IP Address of your Masternode VPS that you copied from step 11 of Install Server: Set Hostname and Deploy. Your IP Address in this file needs to be appended with :7112. For example: 175.145.10.150:7112
(3). Masternode Private Key - this is the private key we generated in step 4 of Configure Desktop: Generate Private Key.
(4). Collateral Output and Index - this is the collateral id and index of the 500K $Pac we sent to collateralize our Masternode, from step 5 of Configure Desktop: Get Collateral Tx Id.

Referring to the screen shot above, add your Masternode information on the 3rd line. Make sure that you have exactly one space between sections 1, 2, 3, and 4. Also, verify that you have :7112 on the end of your IP Address, and that there is a space at the end between your collateral tx id and index (the index will be either a 0 or a 1).
Once you’ve double checked the entries, save the file, and close out of your editor.
Go back to the $Pac Desktop Wallet, and close the program. Restart your $Pac Desktop Wallet so that it can read the configuration information for your newly configured remote MN.
In the next step, we will start and broadcast our Masternode onto the network.
Start Your Masternode
Once you restart your desktop wallet, go to the “Masternodes” tab. From there you should see your newly configured Masternode displayed in the table as shown below:

(1). This is the alias you configured previously (“MyMN1” in the screen shot).
(2). This is your remote MN’s vps IP Address with :7112 appended at the end.
(3). This is your Unique $Pac receiving address where your Masternode Rewards will be paid to, as we configured in Configure Desktop: Create Unique MN Wallet Address.
These next steps will “start” your Masternode on the $Pac network as well as broadcast to the network your MN’s IP Address and collateral tx id (needed for validation).
- 1. Select your Masternode in the Masternode’s table.
- 2. Click the “Start Alias” button:

- 3. Select “Yes” and enter your wallet passphrase when prompted , then hit ok.
Now that the Masternode is started, let’s check to see that it started sucessfully on the remote VPS.
DON'T WORRY ABOUT THE "STATUS" FIELD ON YOUR DESKTOP WALLET! The status field is incorrect much of the time. It is a known bug that will be addressed in future updates (inherited from the Dash wallet), so don't worry about what is displayed there.
Verify Your Masternode Status
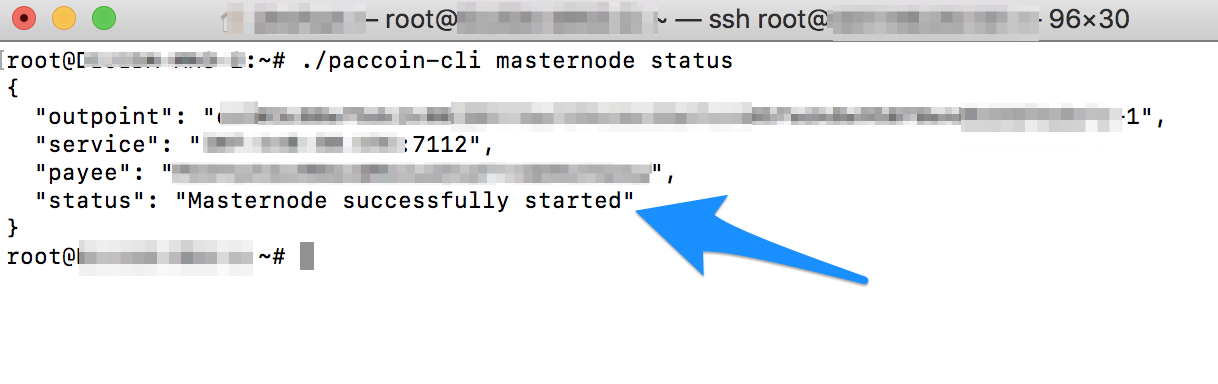
Go back to your ssh client and copy/paste the following into your terminal:
./paccoin-cli masternode status
You should see something similar to the screen shot below. Make sure that the status says “Masternode successfully started”:
Next Step: Monitor Your Masternode
Your Masternode is now up and running! The next step is to Monitor Your Masternode and collect rewards.
