We are now ready to install the Masternode server on your VPS. A quick reminder of where we are below:
Steps to create your Master Node
-
1. Getting Ready -
2. Configure your desktop wallet - 3. Install Master Node server on your VPS
- 4. Start your Master Node
- 5. Monitor your Master Node and collect rewards
Choose a VPS Host Provider
Your VPS (Virtual Private Server) hosts the $Pac Masternode software and contains your hot wallet. While your cold wallet (running on your desktop or laptop) can be shut down and offline, your hot wallet must be always running and connected to the internet.
There are many VPS hosts out there. This guide will walk you through setting up your $Pac Masternode on one of the most popular hosting providers, Vultr.
If you want to use my referral link, you can click here: https://www.vultr.com/?ref=7481728 or the image below (disclosure: I get credits on hosting if you use the referral link).

If you don’t want to use the referral, just go directly here Vultr.com. If you are setting up your Masternode on a different VPS host, most of the general process should be the same except for Vultr specifics. Once you have finished registering and setting up your account information, you can proceed.
When setting up your VPS hosting account, please make your passwords are secure.
Create Your VPS Instance
Create New VPS
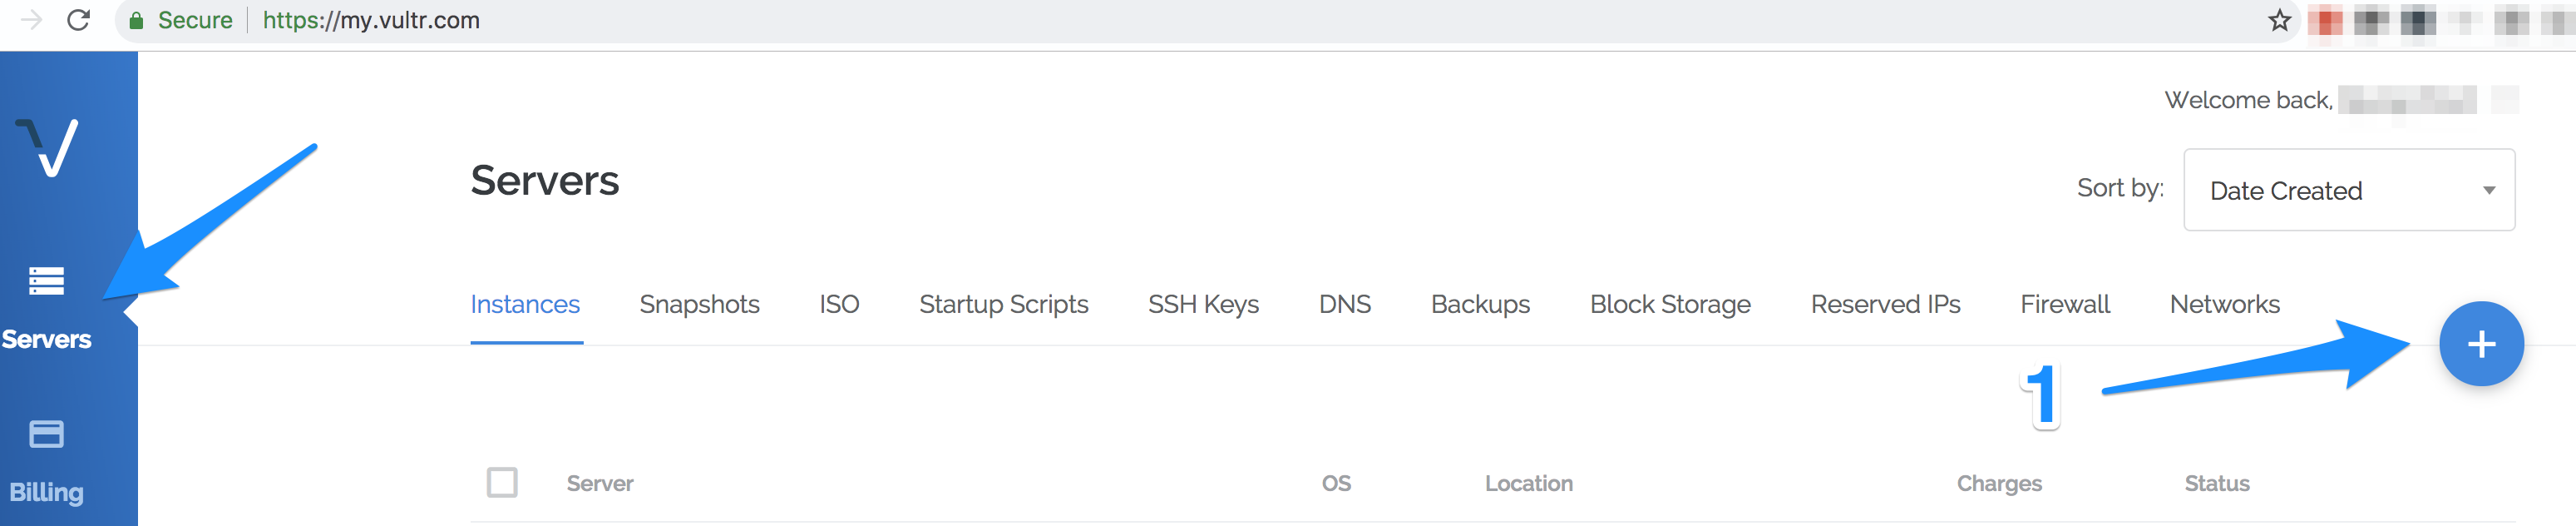
Once you login into your Vultr dashboard, click on the “Server” tab on the left hand side. Refer to the screen shot below:
-
1. Click on the blue circle to create your virtual private server to host your $Pac Masternode.
-
2. Choose any server location, as seen in the screen shot below. Just please don’t pick Miami. I don’t know why, but I’ve had several users with issues in that datacenter location with vultr. I myself have had issues there as well, with random reboots. Any other location should be fine. Vultr has a lot of datacenters you can choose from to host your VPS instance. Refer to the screen shot below and follow the next step:
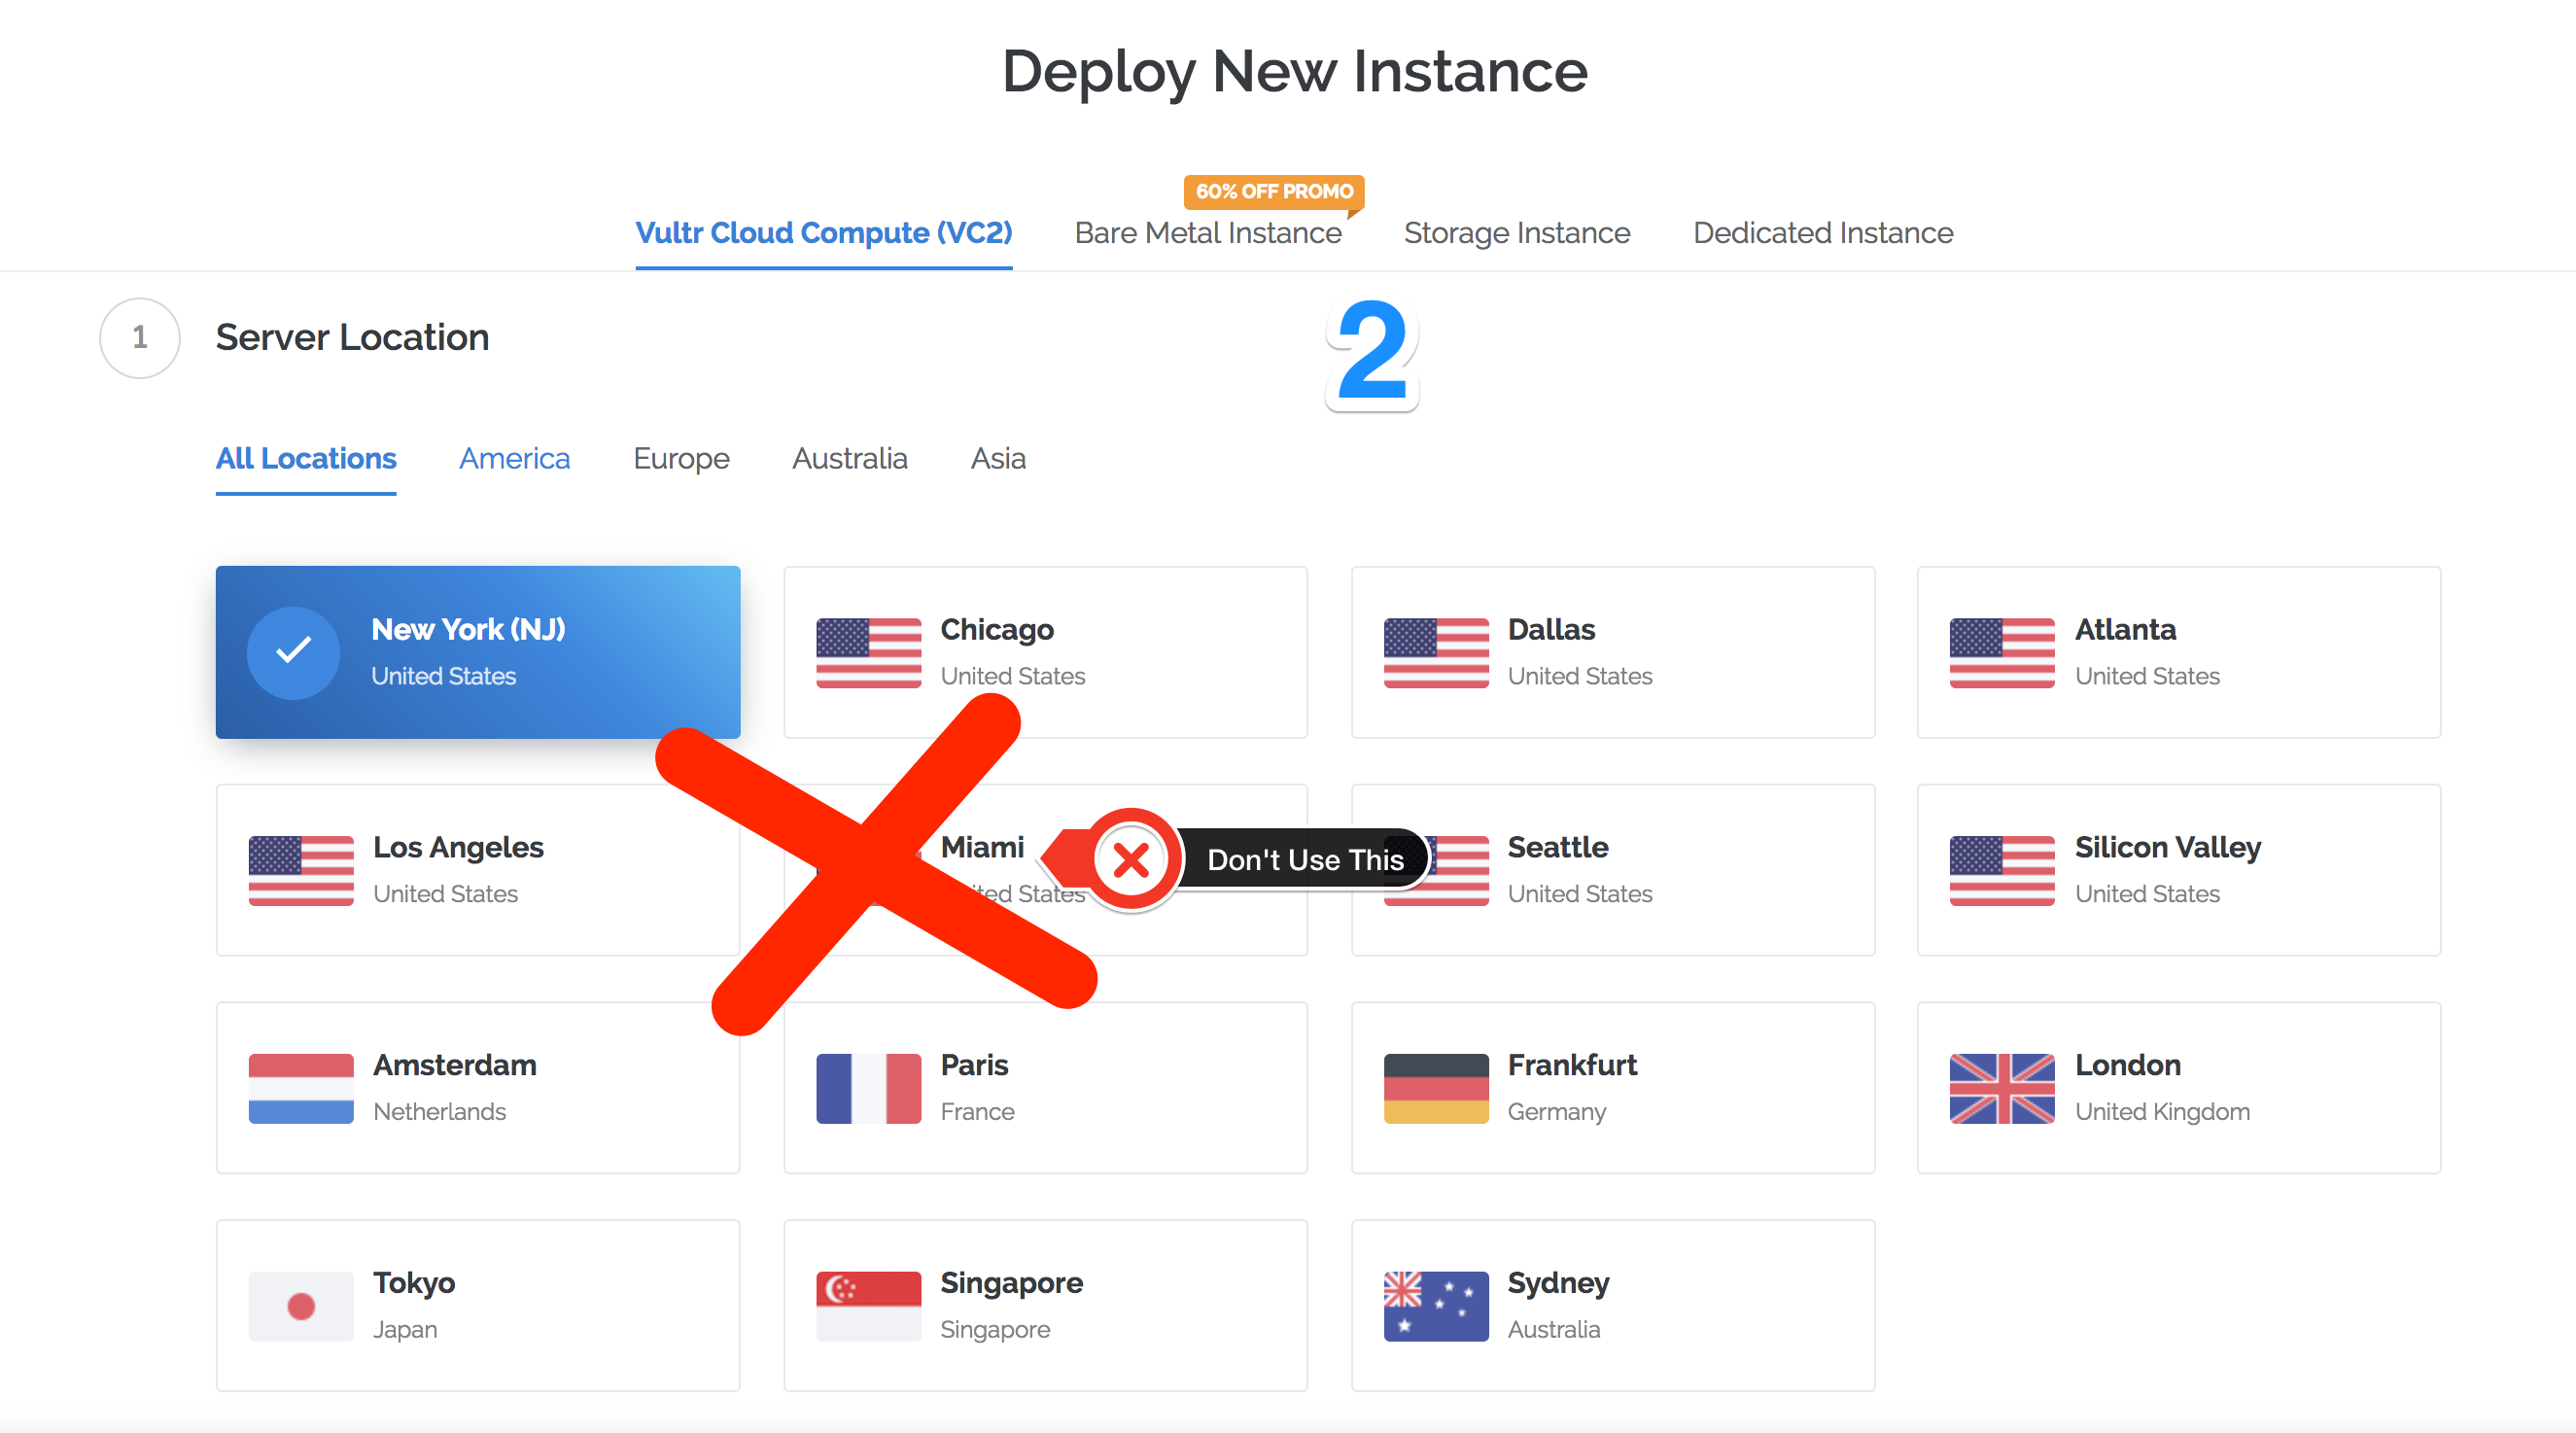
Although you can pick whatever you want, I personally recommend choosing a US based server. Why? As of this writing, almost 45% of the Masternodes currently on the network reside in US-based datacenters. MNs, especially when first starting, need to constantly sync and communicate with each other. If you choose a datacenter location that is far away from a community of MNs then it will take a little bit longer for each communication. You can see the current $Pac Masternodes map at the $Pac Explorer site
Choose Server Type and Size
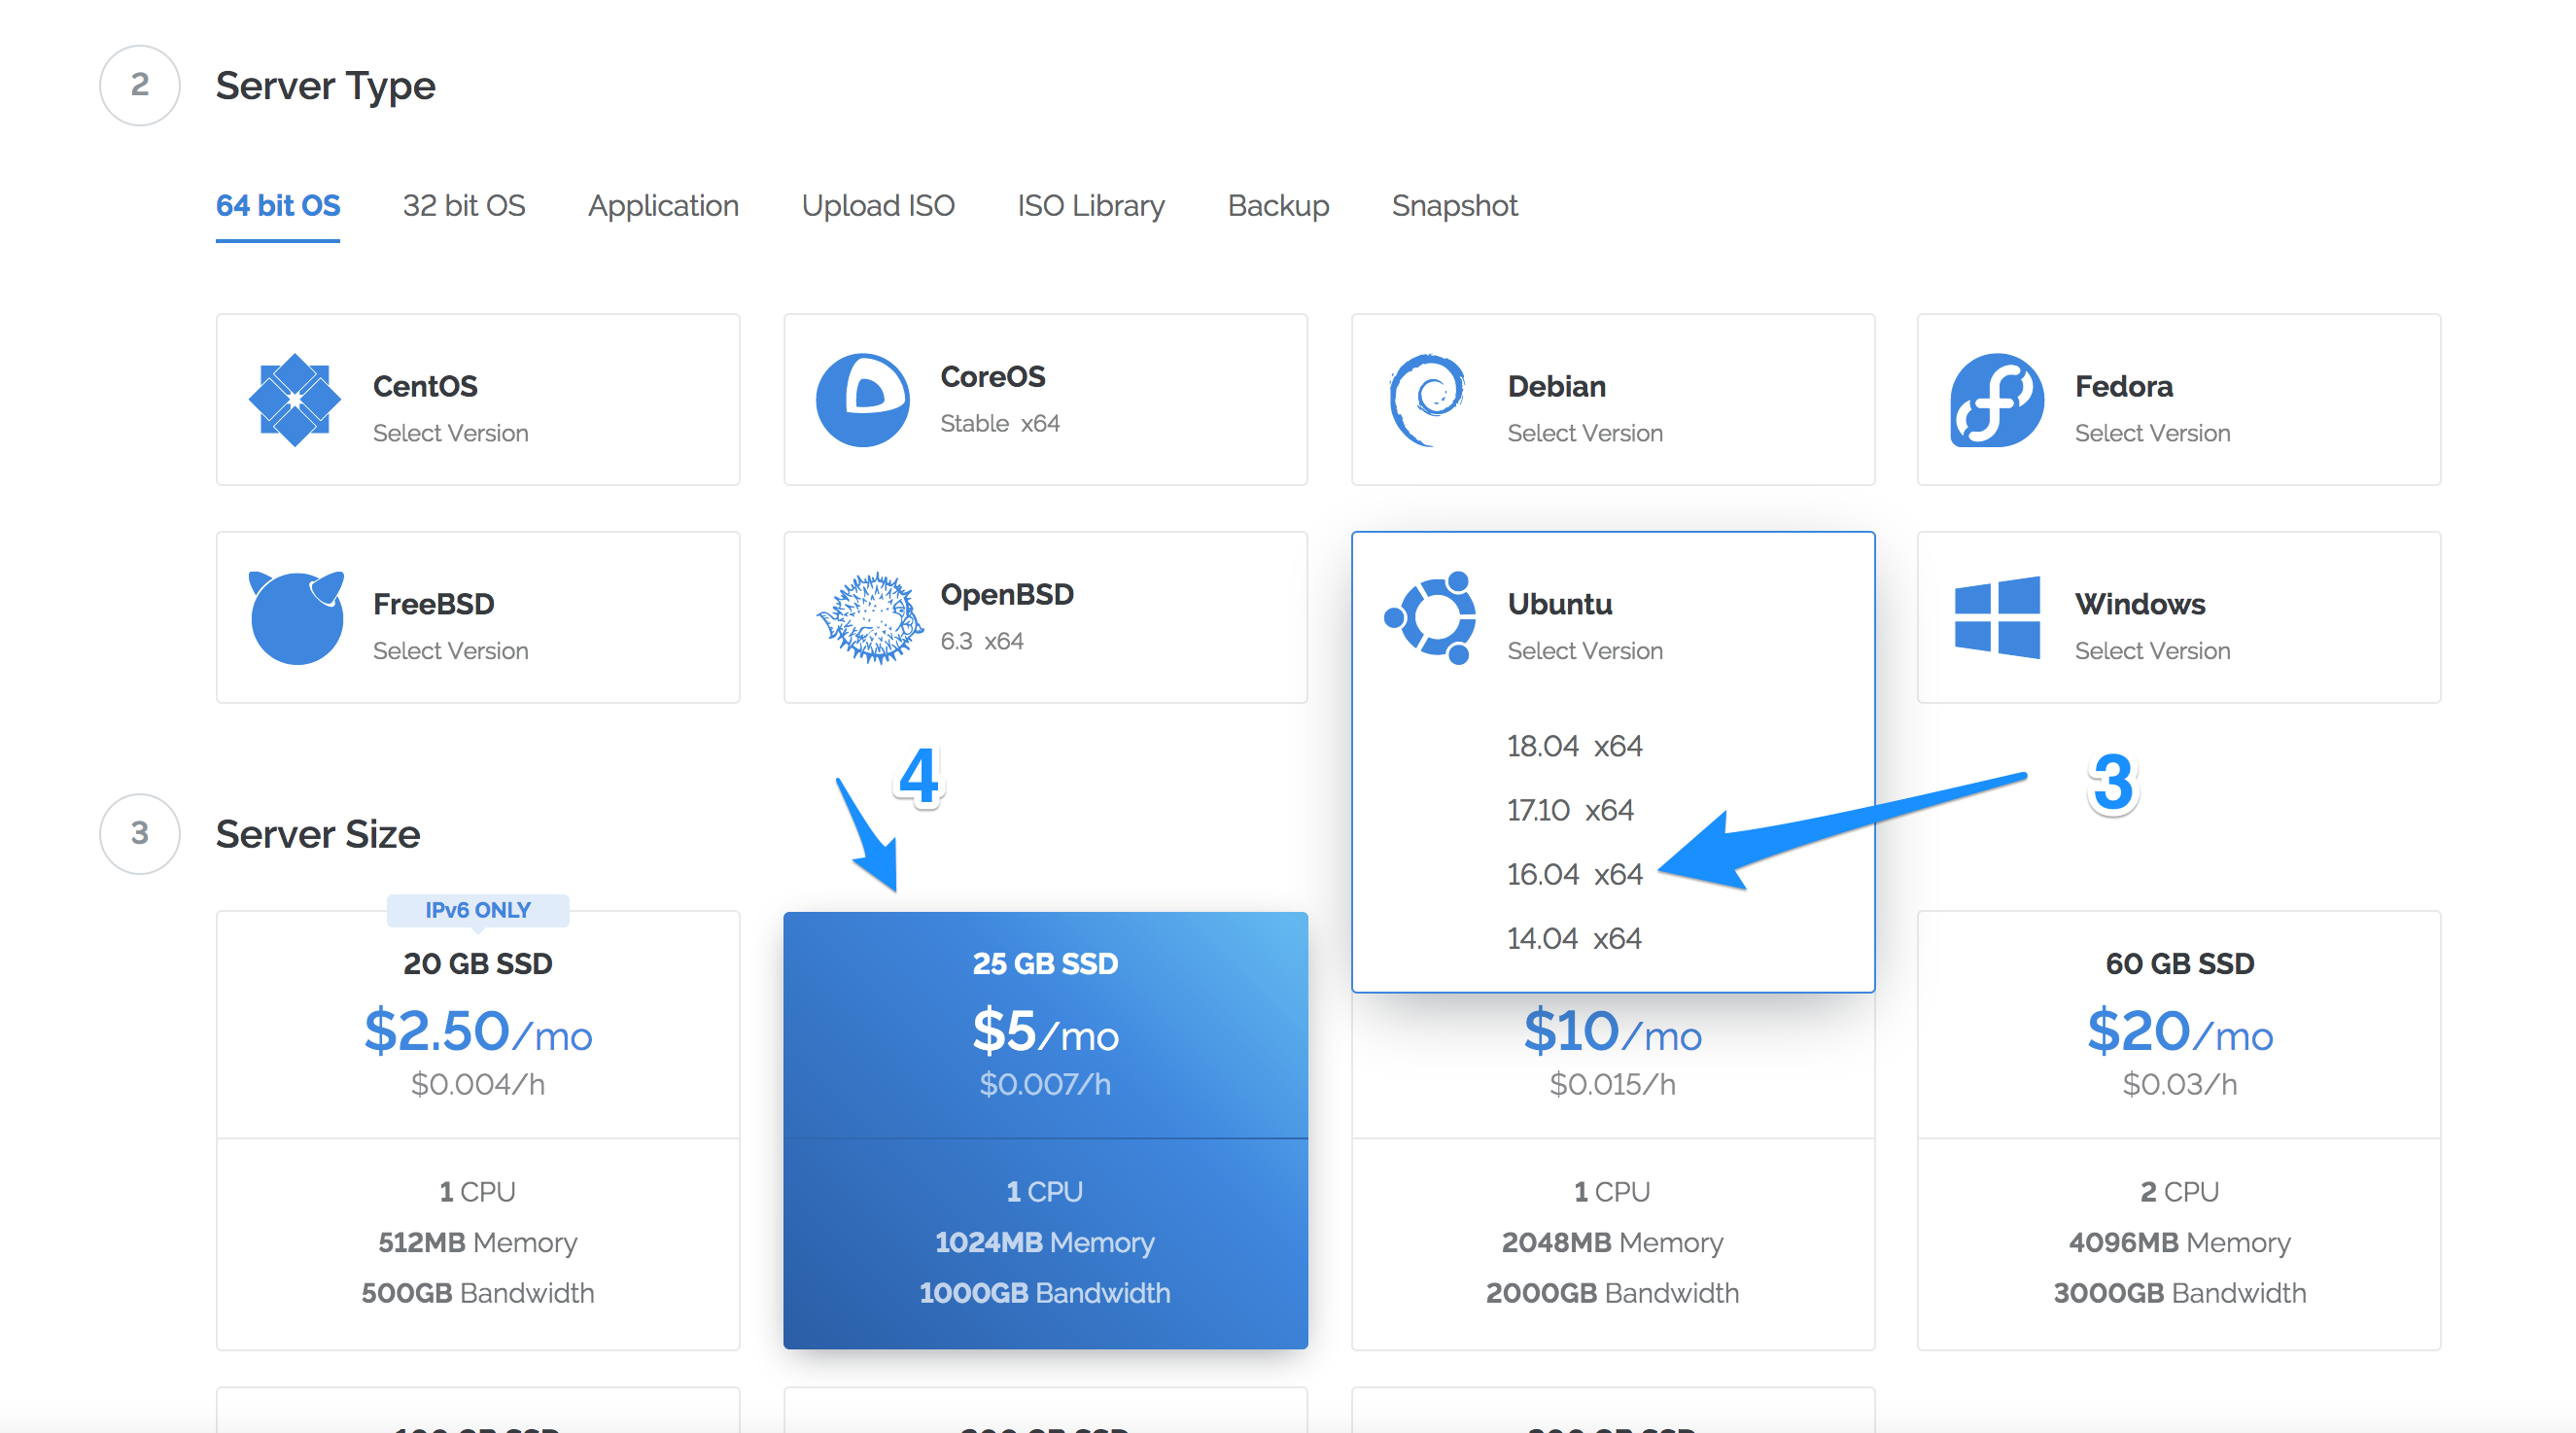
In this step, you will select the operating system for your Masternode as well as the virtual server size. The recommended operating system is Ubuntu 16.04 and the recommended VPS size is the $5/mo plan on vultr which has 1024 Mb of RAM for the VPS.
Please note, 512 Mb servers are much more likely encounter errors. This is because the installation running the node uses almost the full amount of available memmory, any spikes in RAM usuage can lead to failures and crashes. Therefore, it is reccomended to allocate 1024 Mb to any device hosting a Masternode, to avoid overloading the instance and provide reliable performance.
I know lots of users host multiple masternodes on their vps, or use Debian, or install the MN on a raspberry Pi. More power to you if you can do it. However, using Ubuntu 16.04 and 1Gb RAM ($5/mo plan) is the recommended configuration and will give you the smoothest Masternode experience.
- 3. Select Ubuntu 16.04
- 4. Select the $5/mo plan (25GB SSD, 1 CPU, 1024MB Memory)
Configure SSH
If you recall from the First Steps section, we generated ssh keys for communicating securely with our Masternode server. Have your text editor ready where you previously copied your public ssh key and follow the steps below, referencing the screen shots:
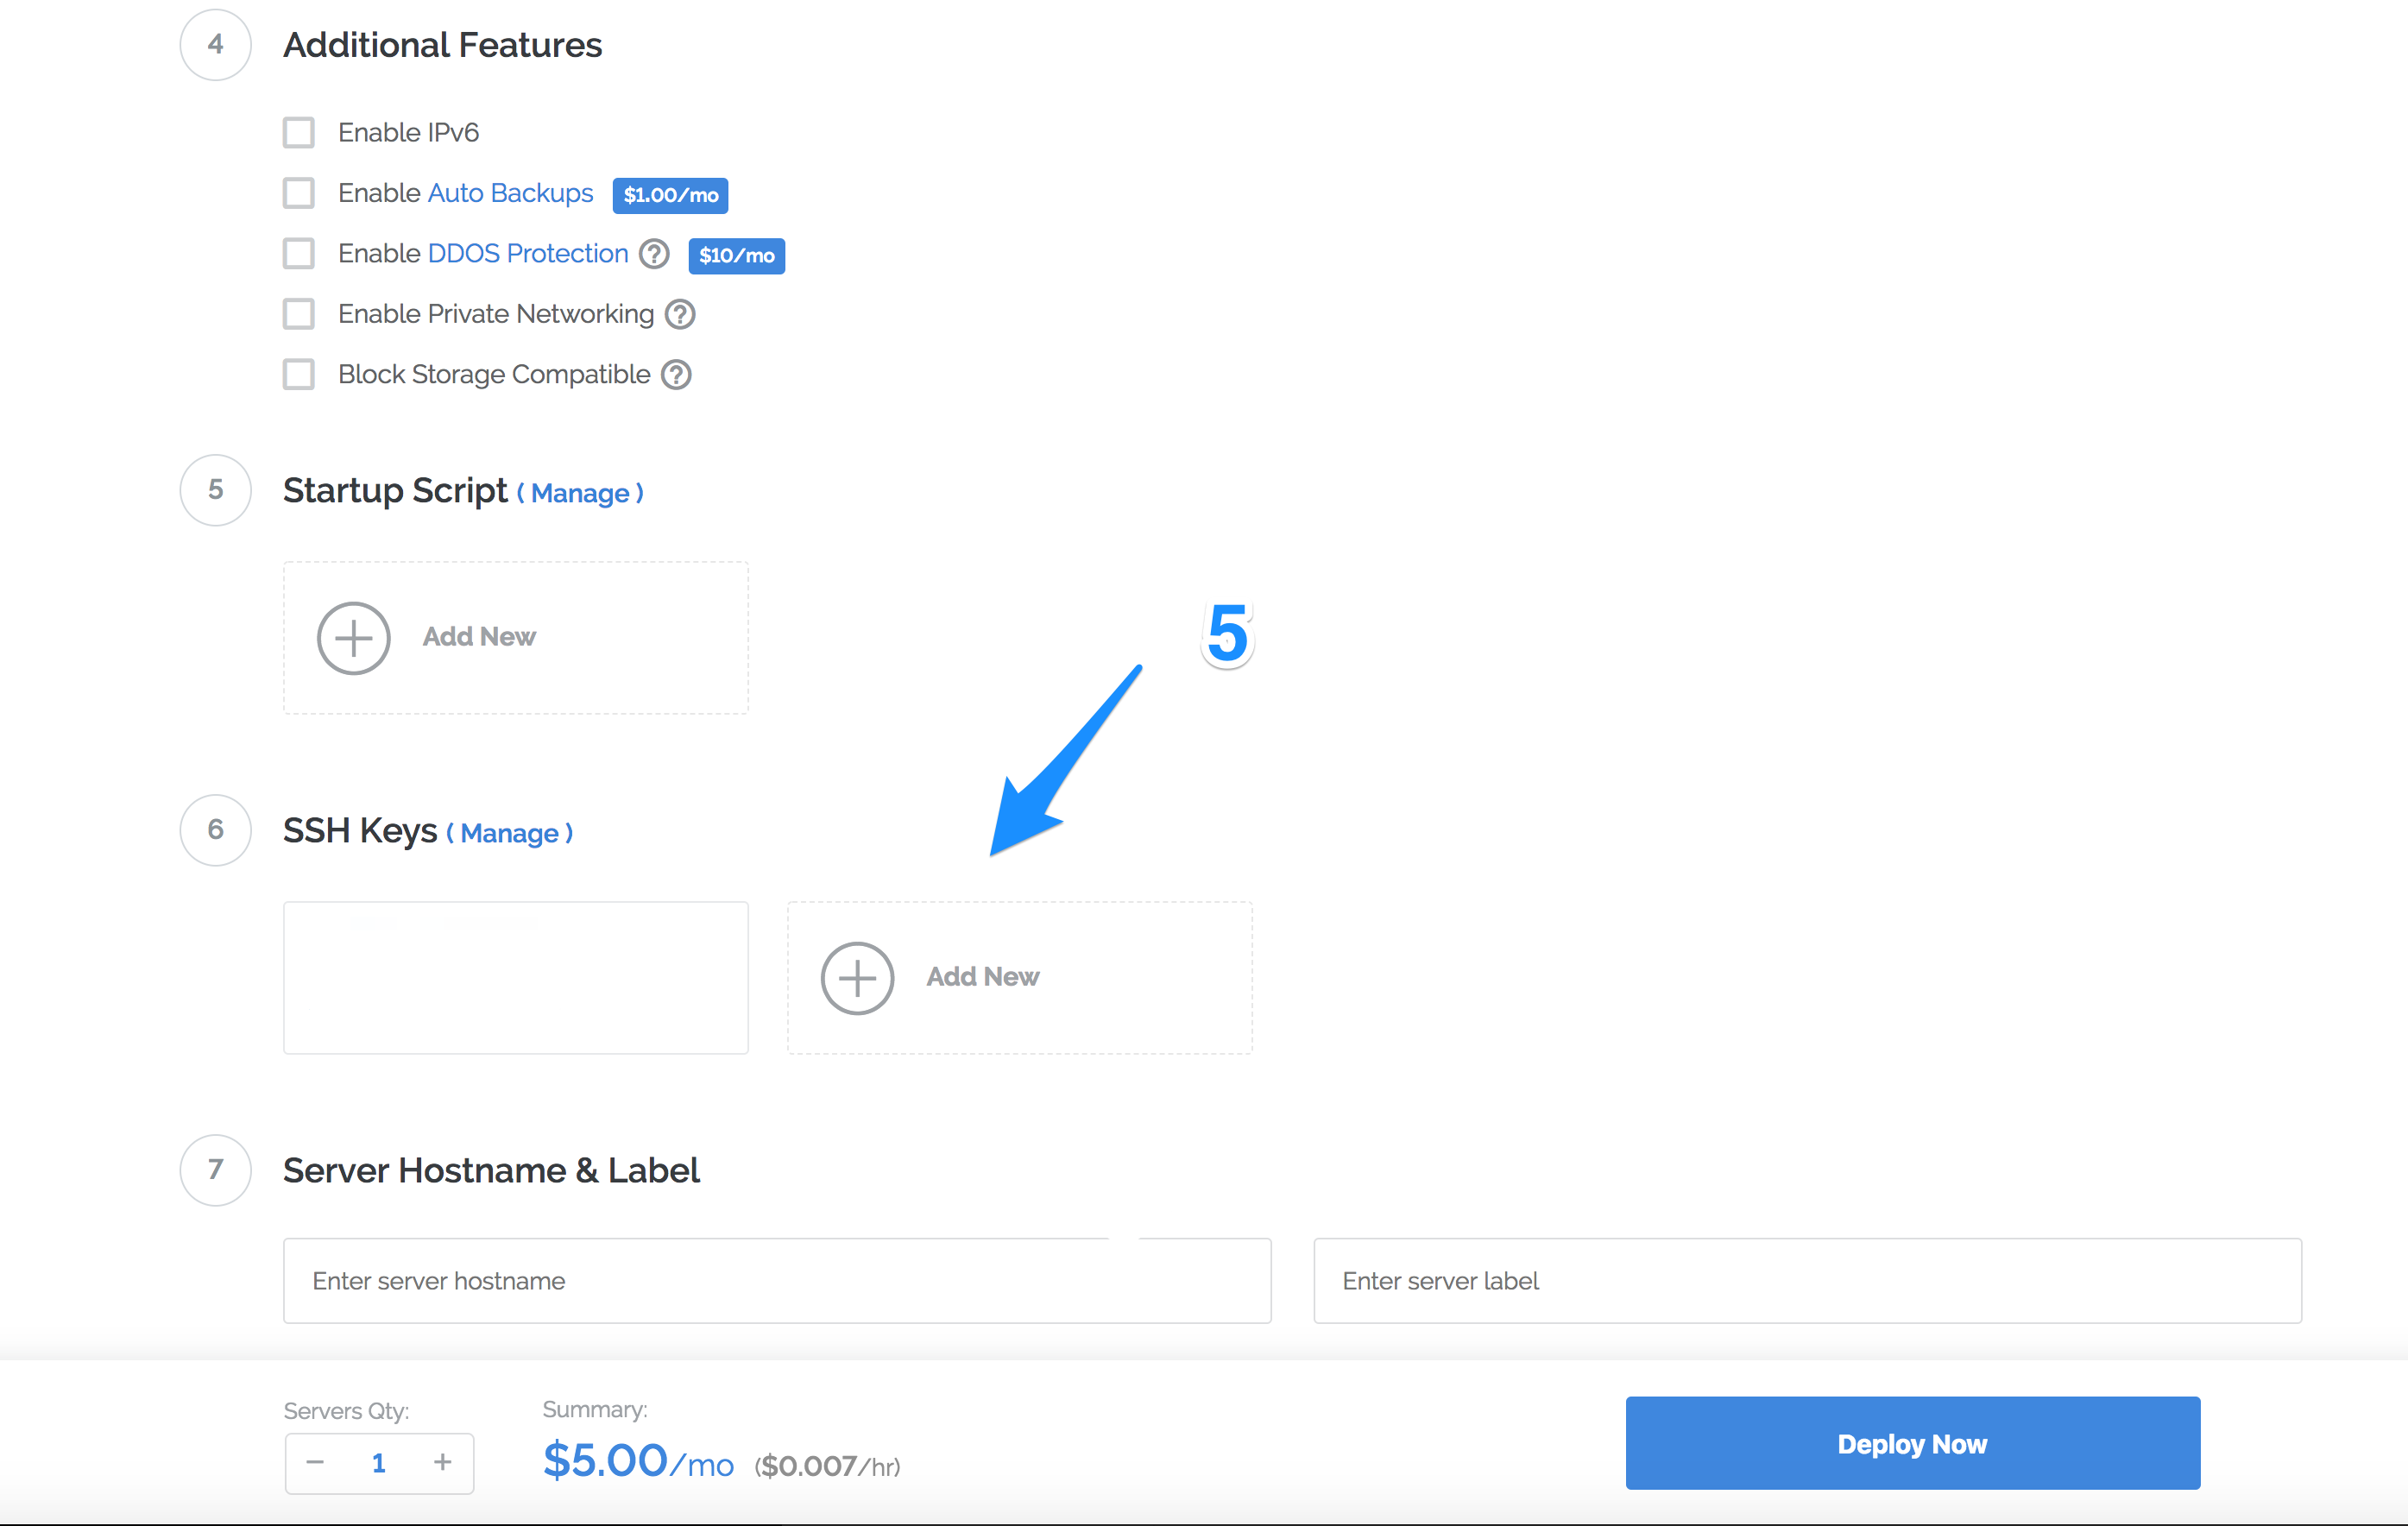
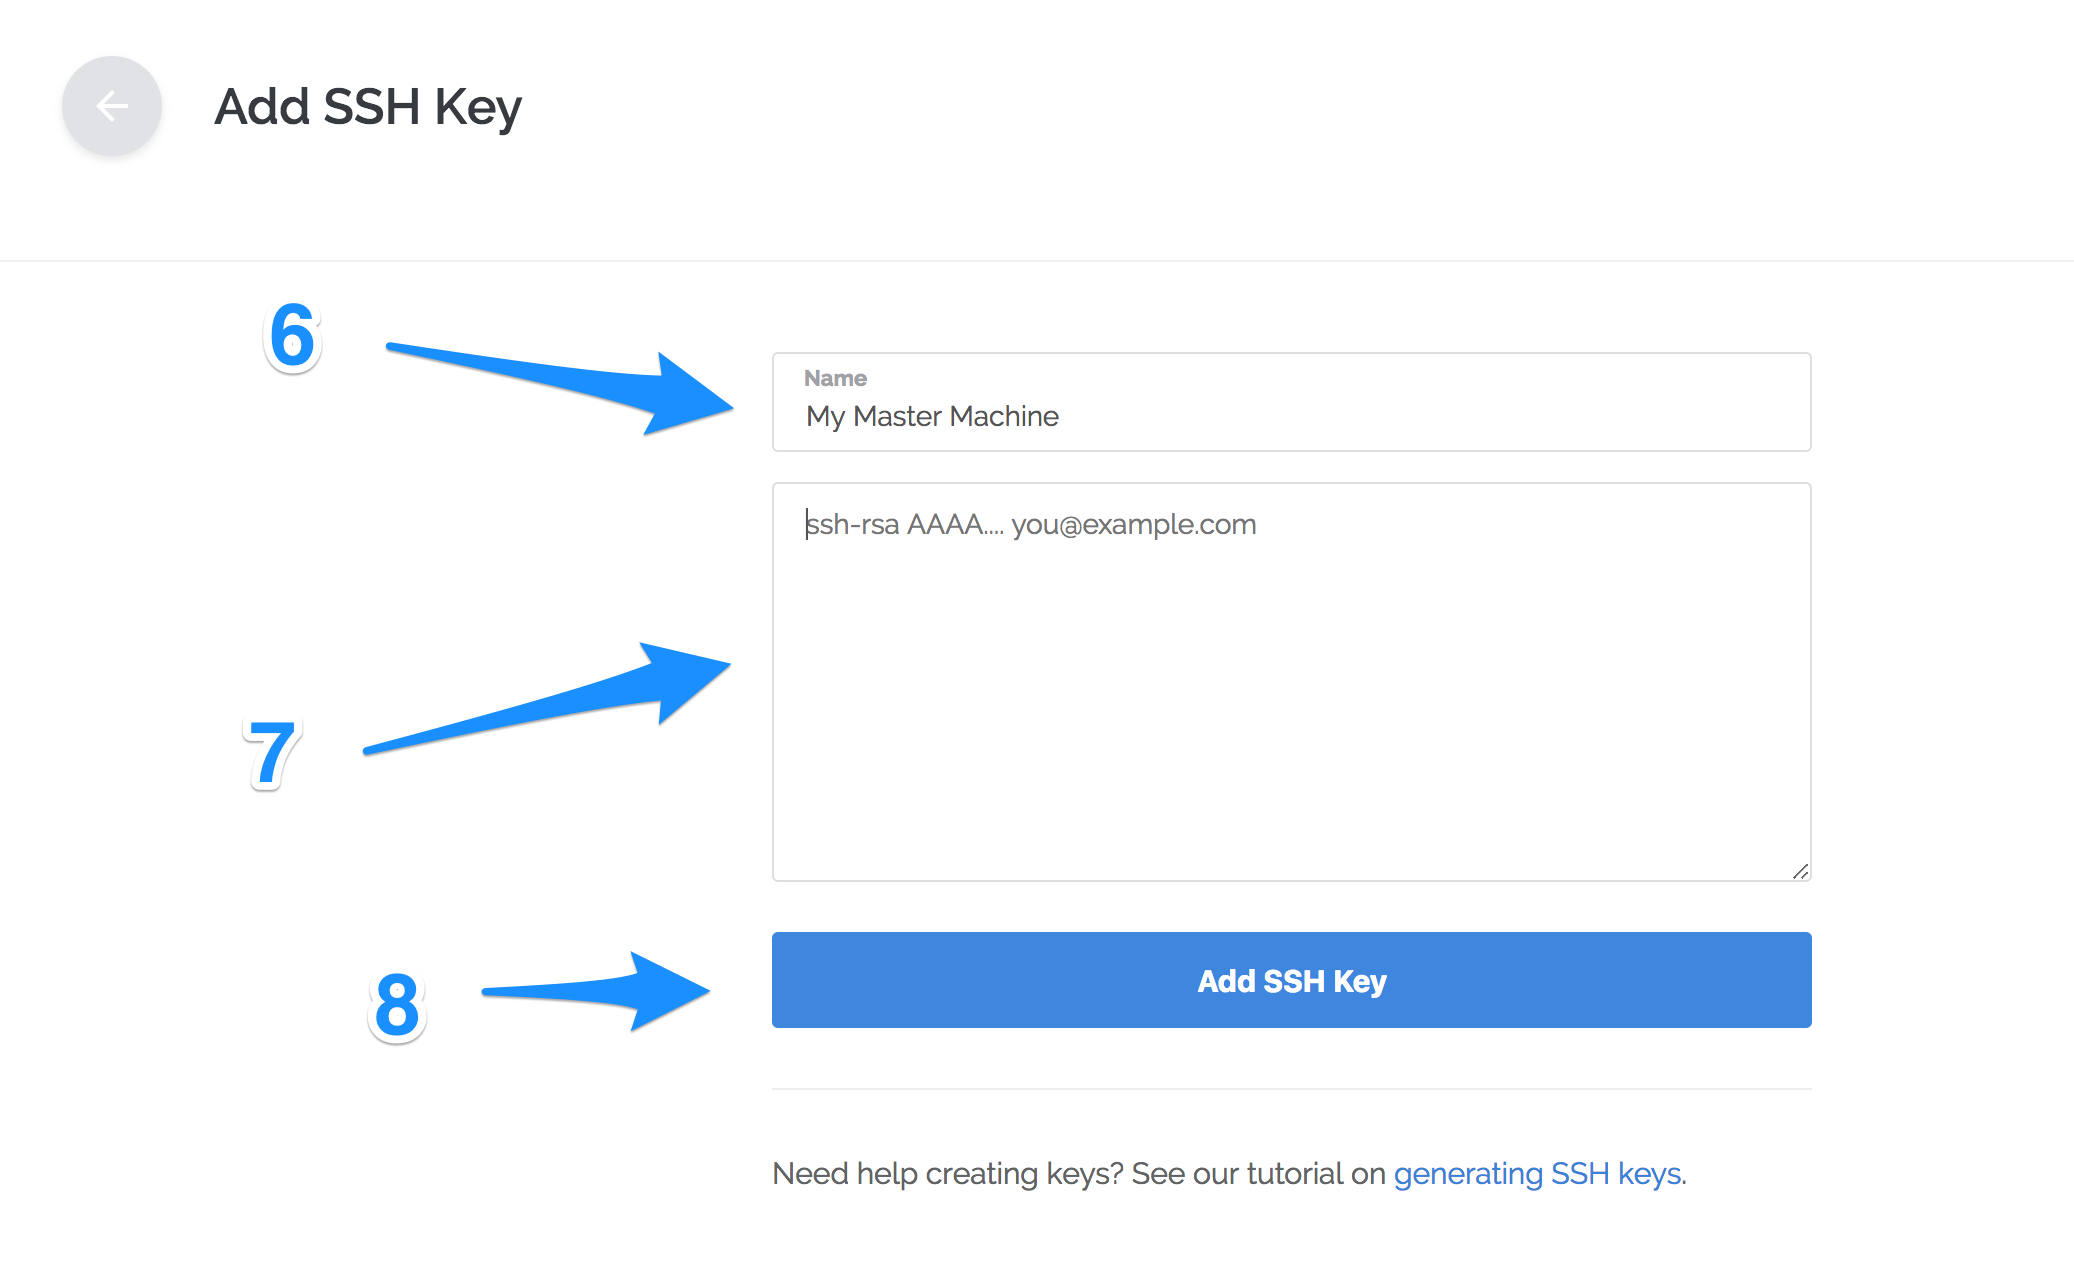
- 5. Click “Add New” button under the “SSH Keys” section which will lead you to the screen below:
-
6. Enter whatever name you would like in this field.
-
7. From your text editor, copy your public SSH keys and paste it into this field.
-
8. Click the “Add SSH Key” button.
Now you are back to the previous screen. We are nearly done setting up the vps.
Set Hostname and Deploy
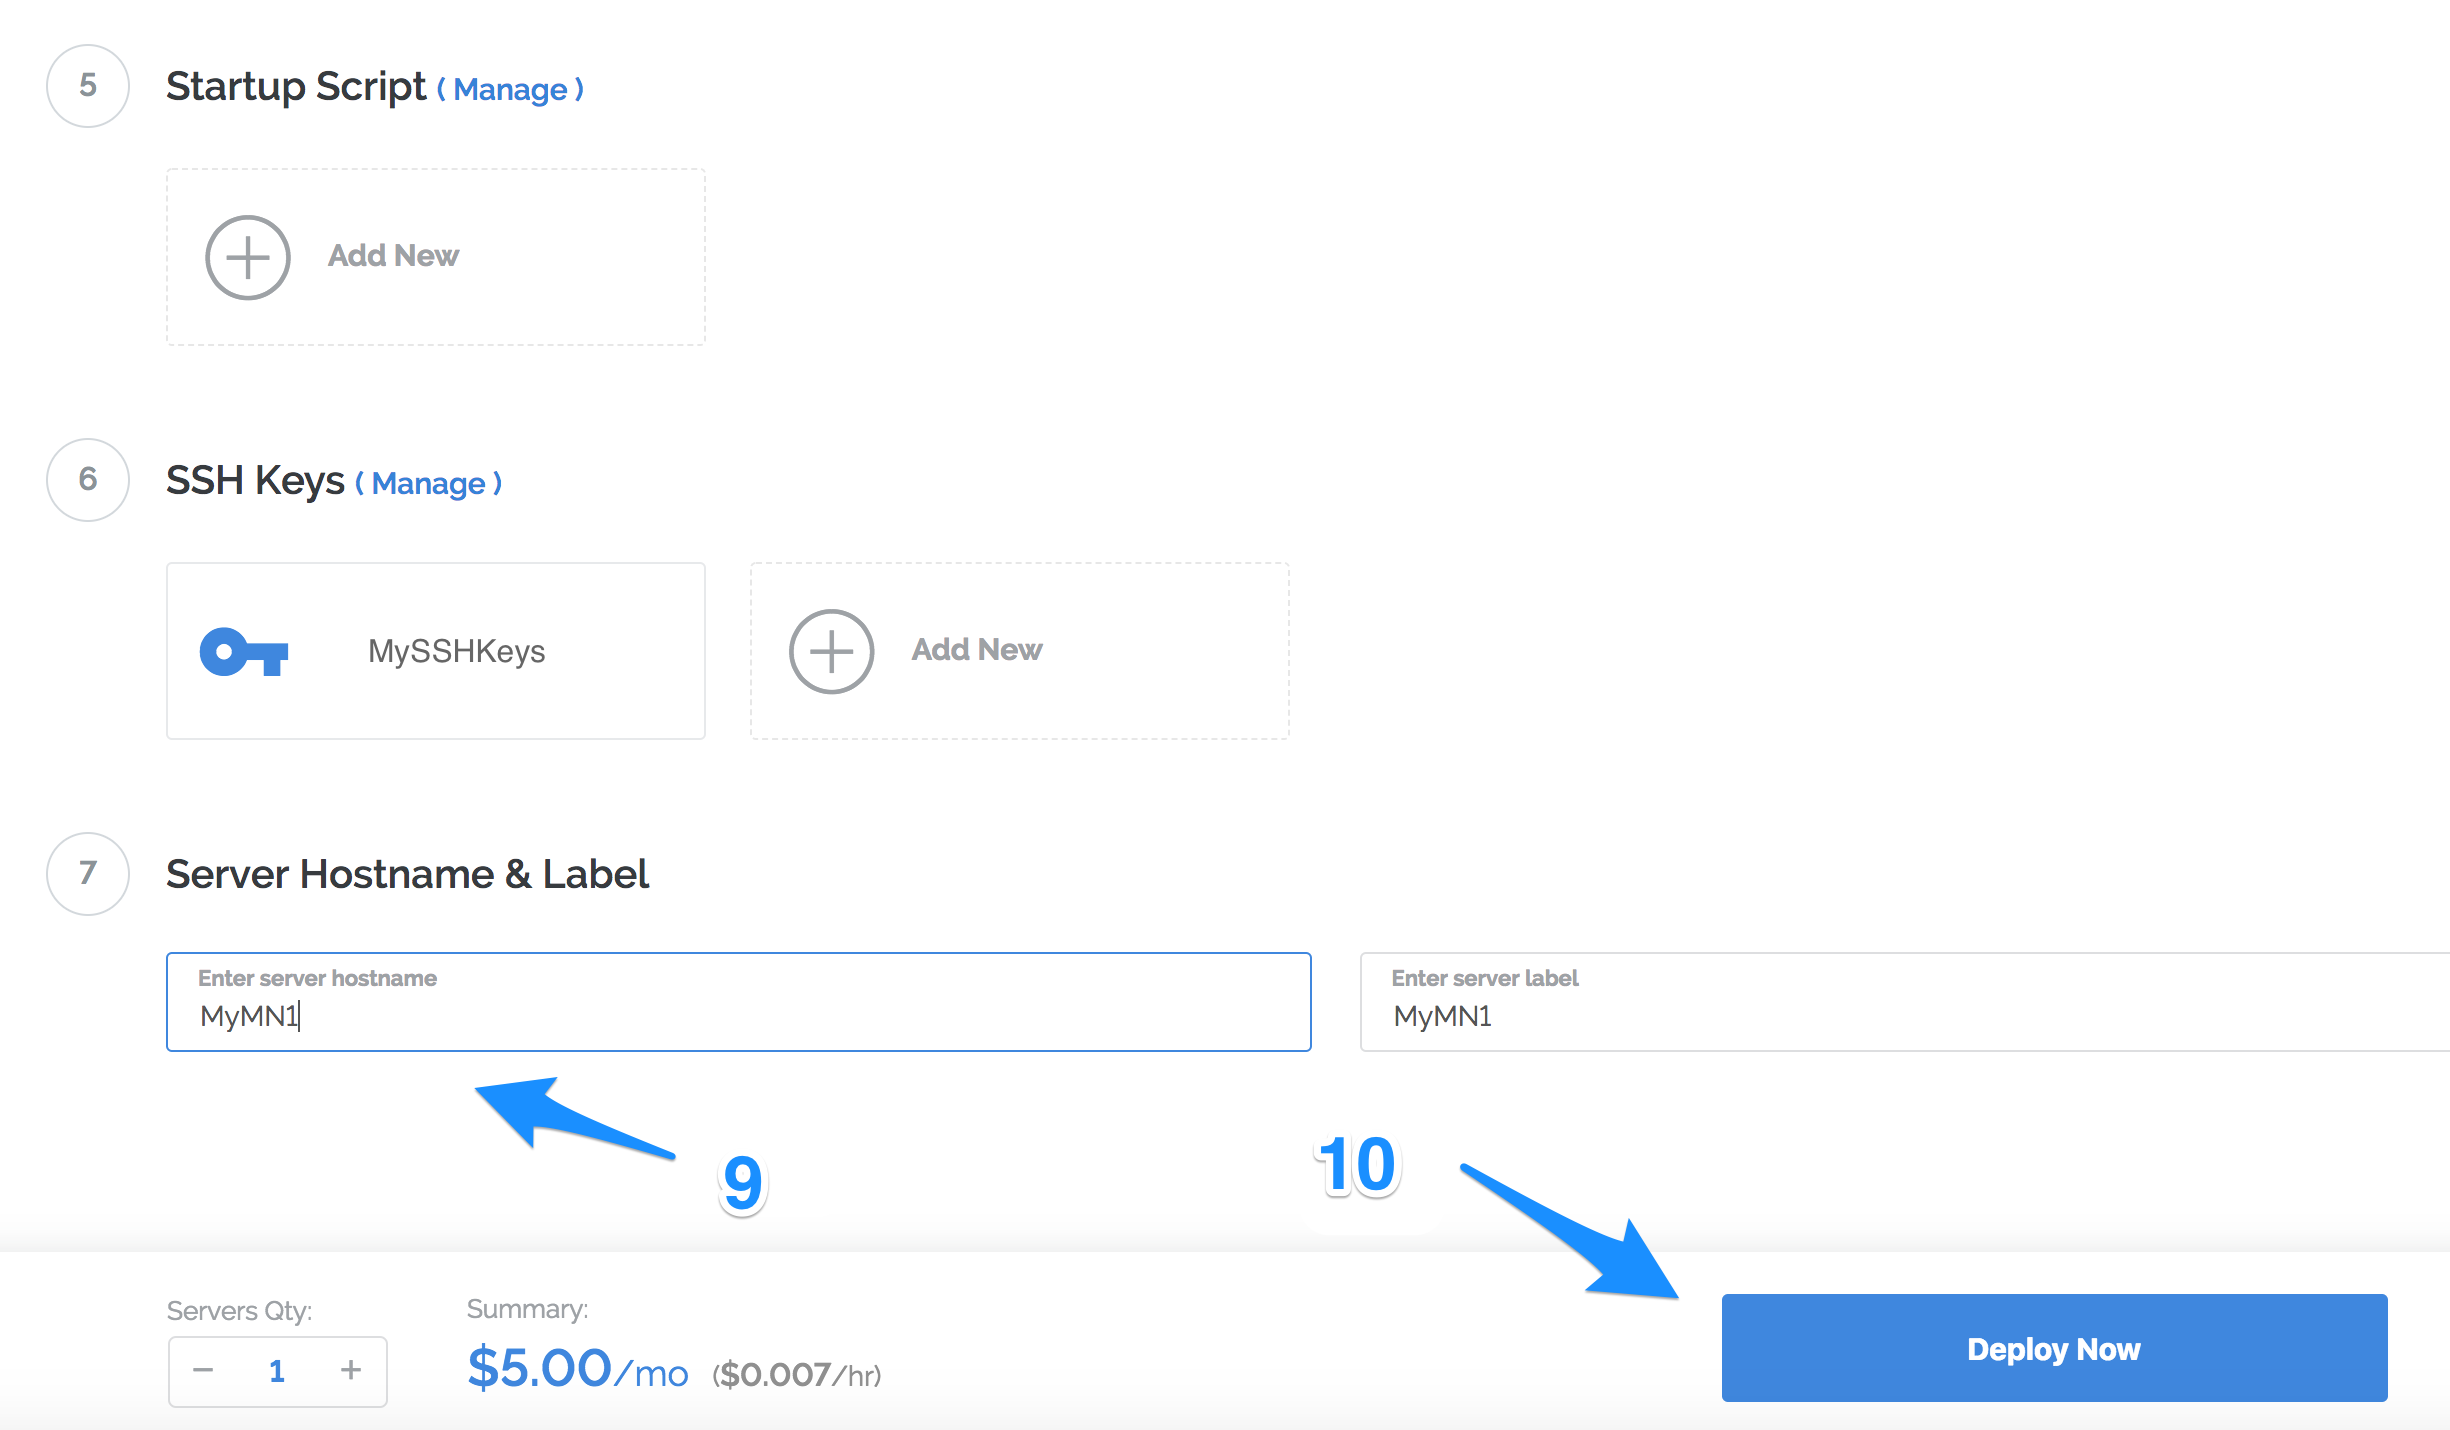
Setting a unique hostname for your Masternode vps can be quite handy, especially if you plan on setting up more than one Masternode. I recommend setting a name for your vps host which is the same as the Unique MN Receive Address you configured in step 2 of Configure Your Desktop Wallet/Create Unique MN Wallet Address. This will help you keep track of your Masternodes, especially when you are running multiple MNs.
Refer to the screen shot below as you follow the next steps:
-
9. Enter a hostname for your vps, e.g. “MyMN1”.
-
10. Click the “Deploy Now” button.
You will be sent back to the Servers tab of your Vultr dashboard and see something like the screen shot below:
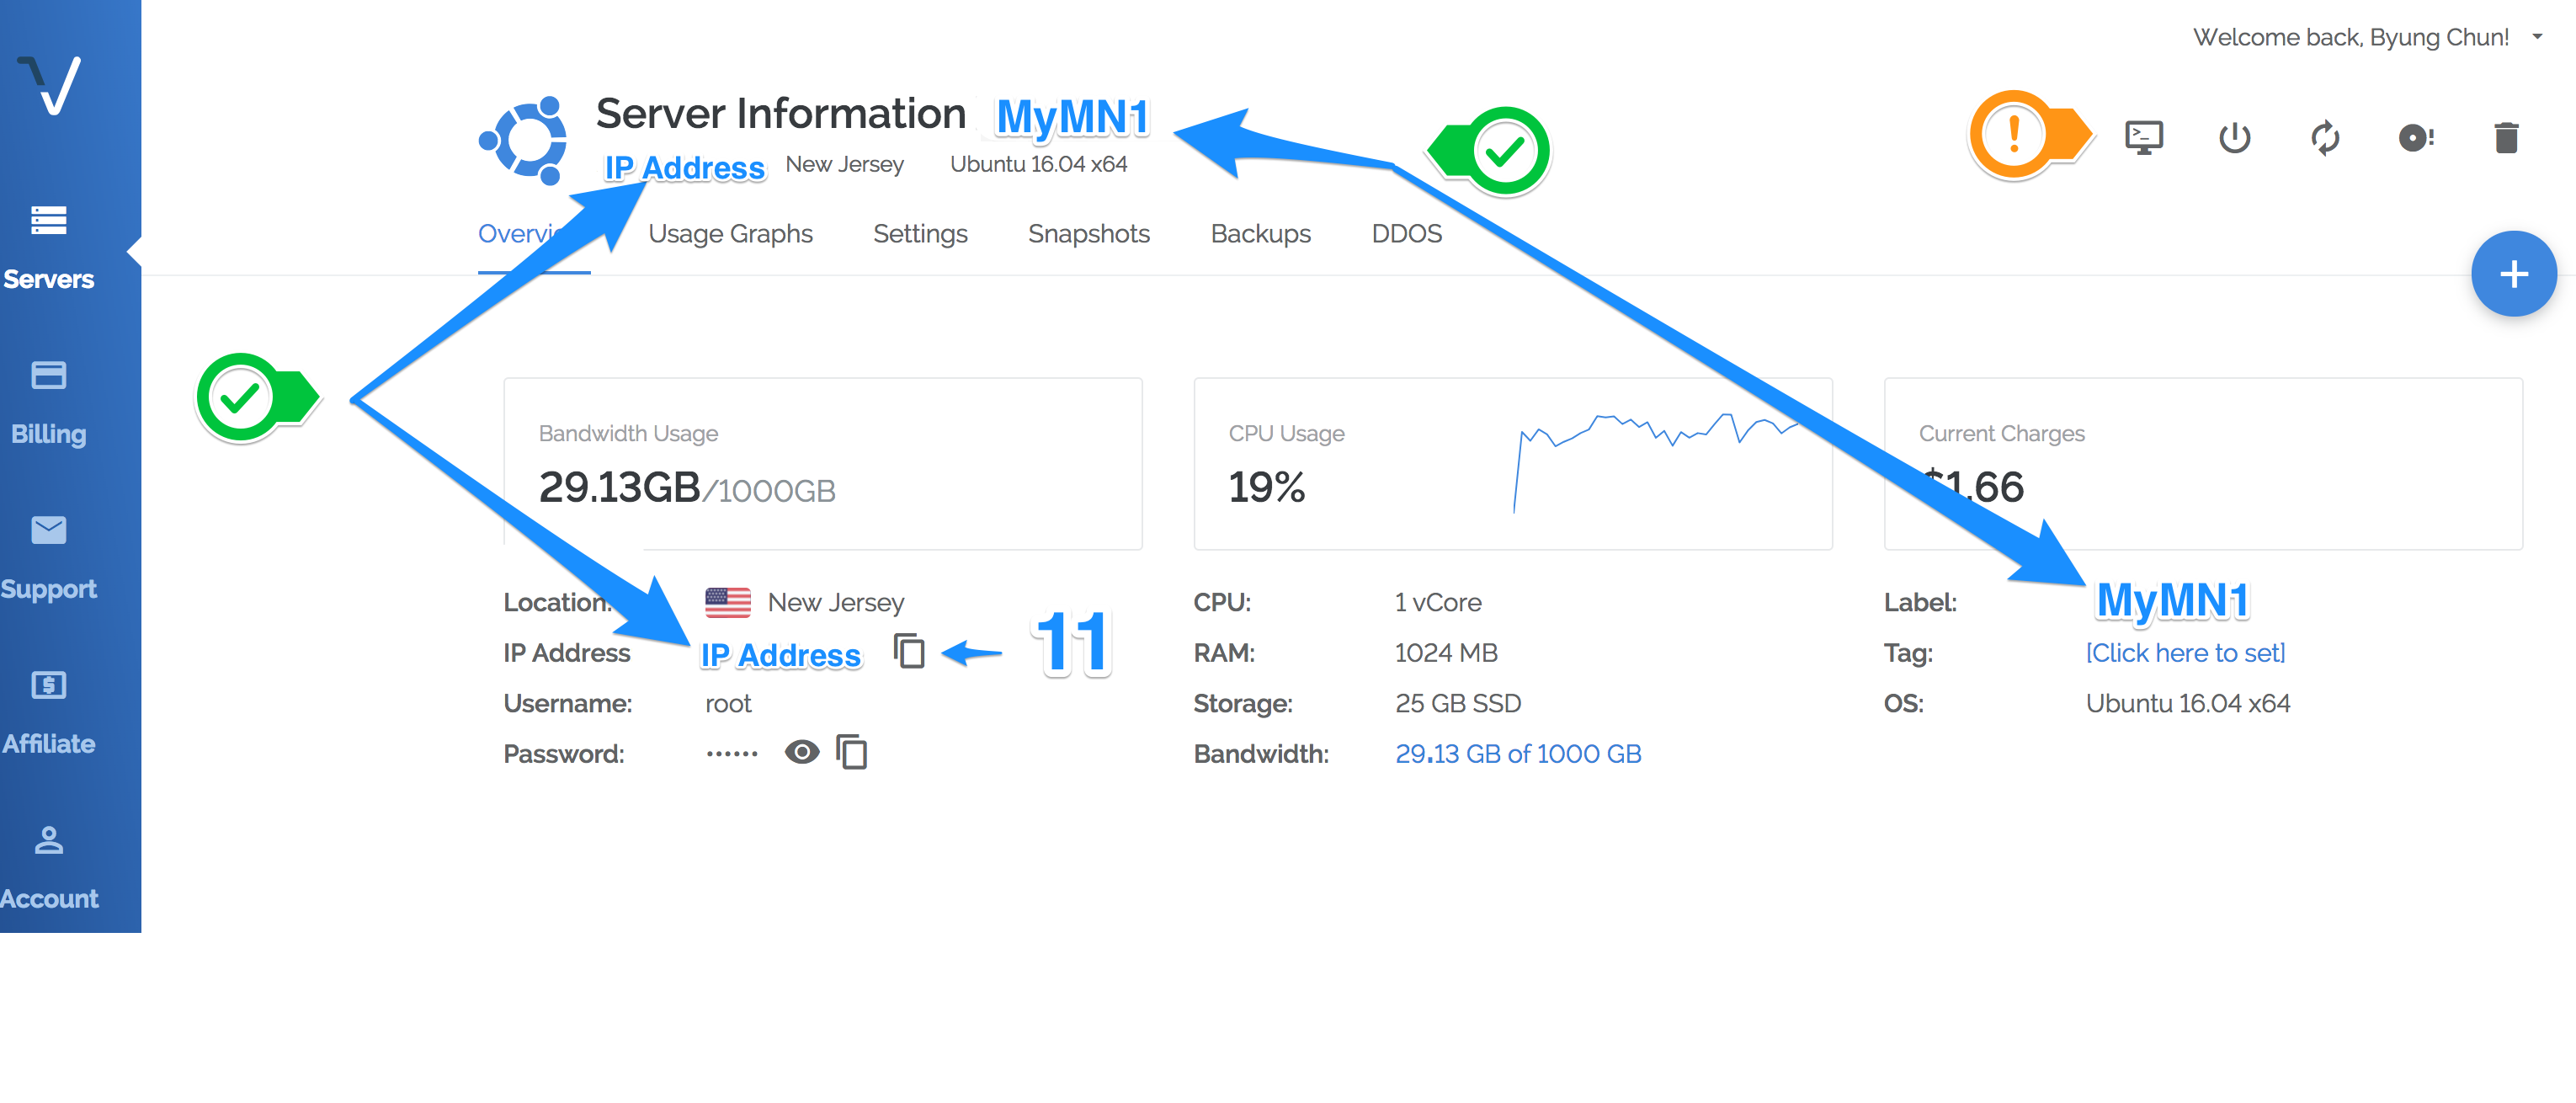
- 11. Click the “copy” icon next to the VPS “IP Address” and paste it into your text editor. We will need that IP Address in the next section, when we install the $Pac Masternode software.
Make sure to double check all of your information. You'll notice that following the naming scheme (MN1, MN2, etc) as explained in this guide will make your life much easier, especially as you invest in more $Pac masternodes. Also, in the sceen shot, in the upper right, you'll see some icons that may come into use at a later point in time to stop and restart your vps.
In the next section, we’ll connect from our desktop to our remote VPS and install the $Pac Masternode software.
Install $Pac Masternode Software
Login via SSH to your Remote VPS
From your desktop, we’ll first set up a secure remote ssh session to the VPS you just created. Follow the instructions below for your particular operating system. You will need the IP Address of the newly-created VPS.
Windows
You can find instructions on connecting to your VPS via putty using the link below. Go to the section labeled “Log in to PuTTY with the private key”. These instructions can be found here:
https://support.rackspace.com/how-to/logging-in-with-an-ssh-private-key-on-windows/.
Once you’ve established your ssh session to your VPS, proceed to the next step Install $Pac Masternode Script.
Mac
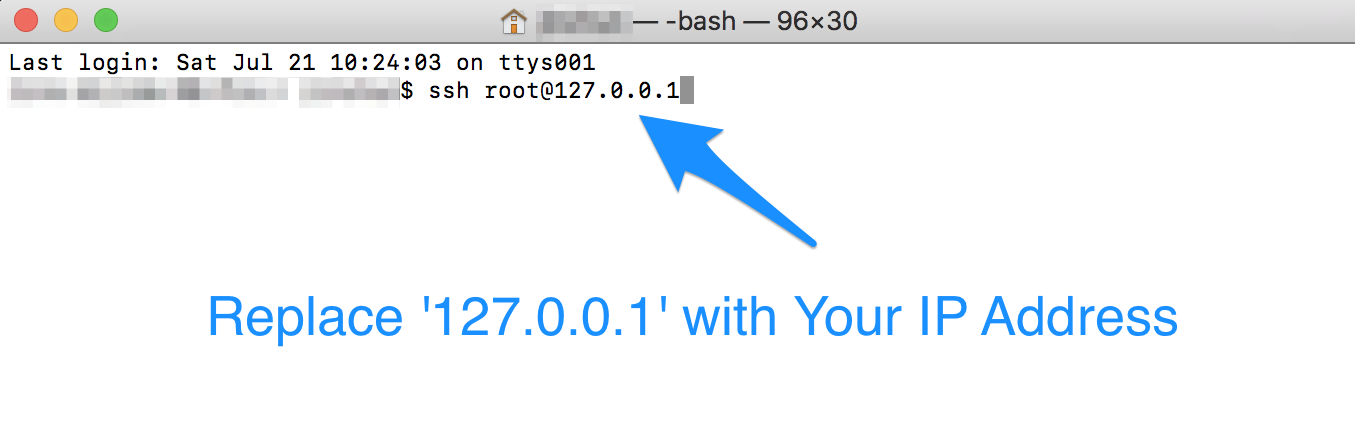
Open Launchpad and search for the application “Terminal”. A basic terminal shell window will open. You may want to resize the window so it is easier to see the output.
ssh root@YOUR_IP_ADDRESS
- 1. In your terminal shell at the prompt, type the line above, replacing ‘YOUR_IP_ADDRESS’ with the IP address of your VPS. For example, if the IP Address is 127.0.0.1, you would type ‘ssh root@127.0.0.1’. See the sceenshot below as an example:
- 2. Press Enter.
- 3. You will be prompted for the passphrase you entered when generating your ssh key pair. Type in your passphrase and hit enter.
Add Swap Space
- Make sure you have sufficient memory (at least 1GB) AND swap space to avoid out of memory errors. If you haven’t already, you can copy/paste the command below to create swap space for your server:
sudo fallocate -l 4G /swapfile && chmod 600 /swapfile && mkswap /swapfile && swapon /swapfile && echo '/swapfile none swap sw 0 0' | sudo tee -a /etc/fstab && free -h
Install $Pac Masternode Script
Next, we will install the $Pac Masternode software from the offical $Pac Github Repository.
The next command will pull down the installer script for the $Pac MN process (paccoind) as well as the Sentinel process (more on this later). Clicking the copy icon will automatically copy this onto your clipboard, then paste into your terminal.
Note If you can’t see all of the text above, you may need to scroll side-to-side (horizontally).
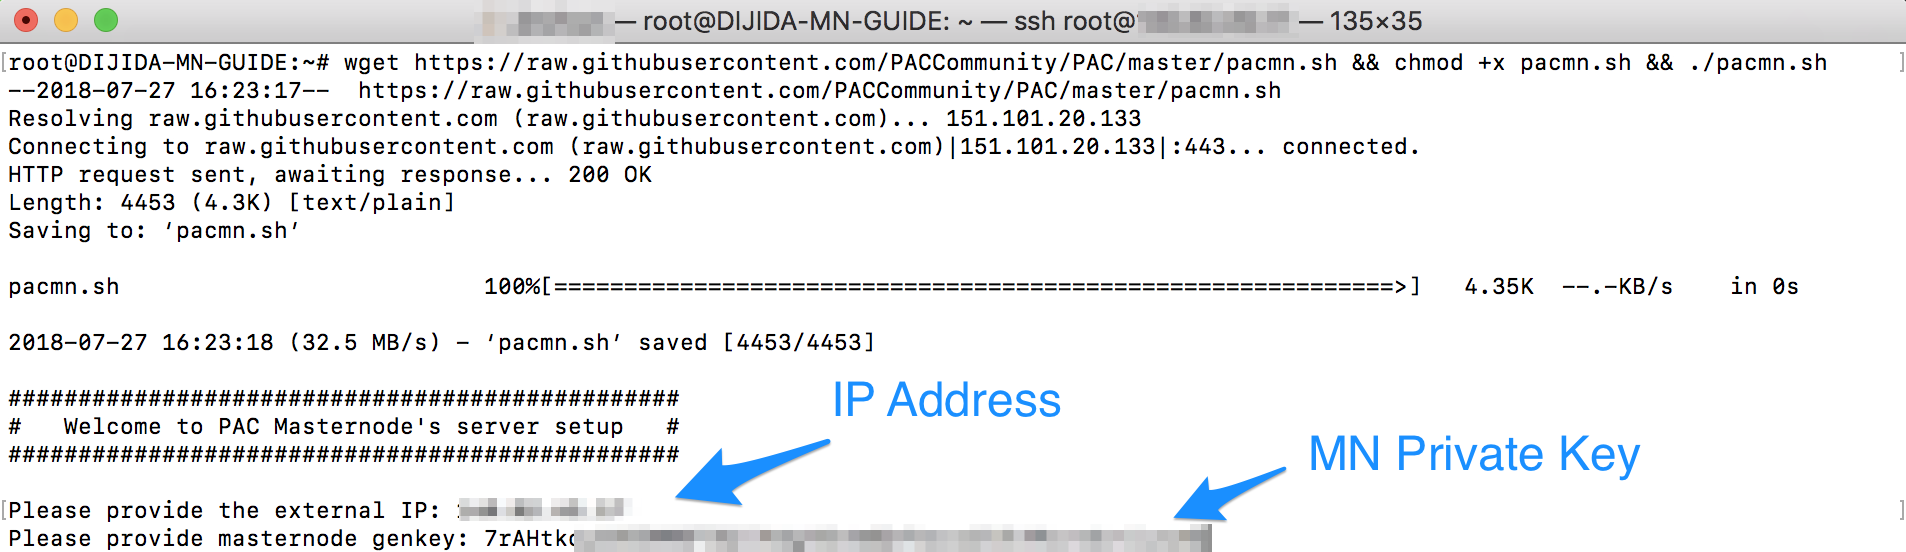
wget https://raw.githubusercontent.com/PACCommunity/PAC/master/pacmn.sh && chmod +x pacmn.sh && ./pacmn.sh
If you used the copy icon, you can simply paste using - Windows: Ctrl+V or Mac: Command+V into your ssh client. If you typed it in, press enter to continue.

You will be prompted for 2 pieces of information: 1) Your VPS IP Address from the previous step, and 2) Your Masternode Private Key. Both of these should be in your text editor from previous steps. Enter the information when prompted and press enter.
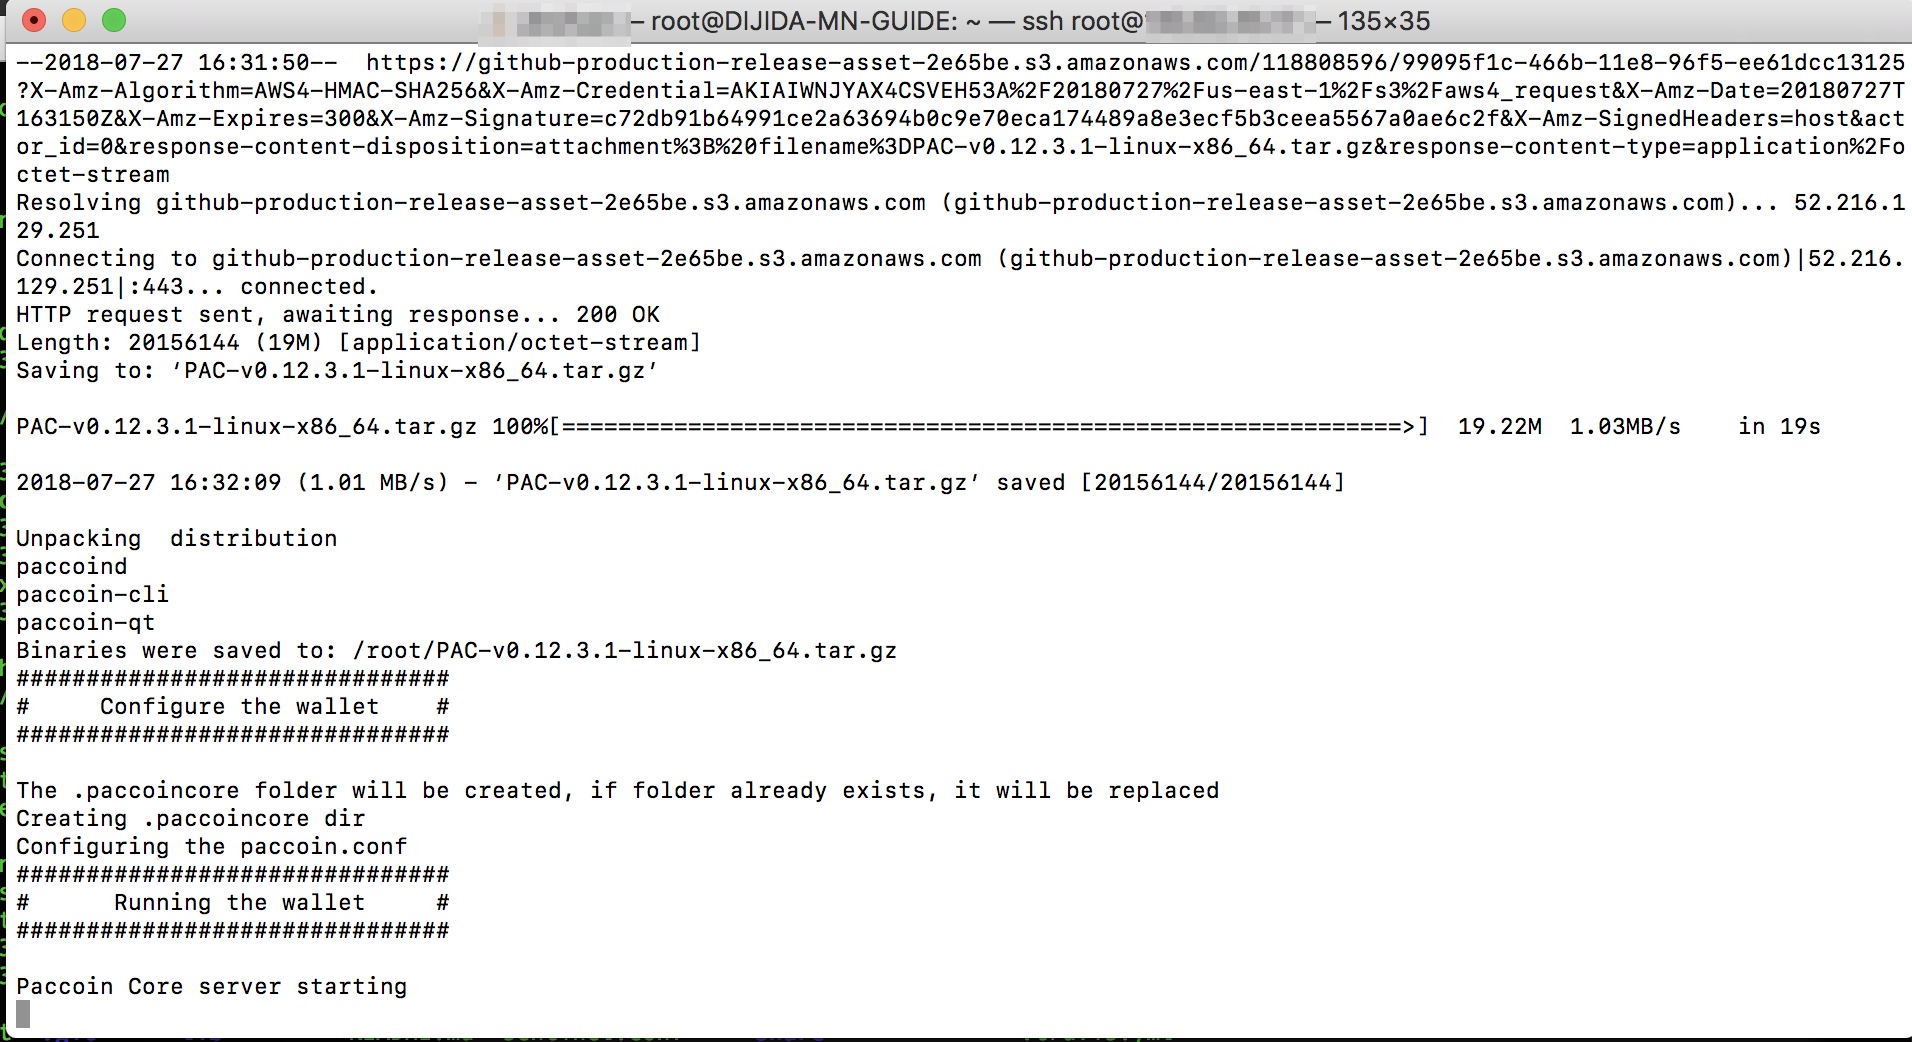
You’ll see a lot of information scrolling through your ssh terminal session as the installer script first installs, and then starts your Masternode server process paccoind and the support process sentinel (along with its entry into crontab).
You will see a lot of information scrolling in the window as the installer progresses. If you see ANY ERRORS, do not continue with the following steps, just bookmark your progress here, and refer to the trouble-shooting section of this guide. Most of the errors I've seen are with the sentinel install at the end of the process.
If you see errors setting the locale in the installer script and you are getting sentinel install errors, you may need to update the packages installed on your vps instance. Run the following command should fix this, then reboot and rerun the installer.
Run command below, then reboot, and rerun the installer
sudo apt-get update && sudo apt-get dist-upgrade
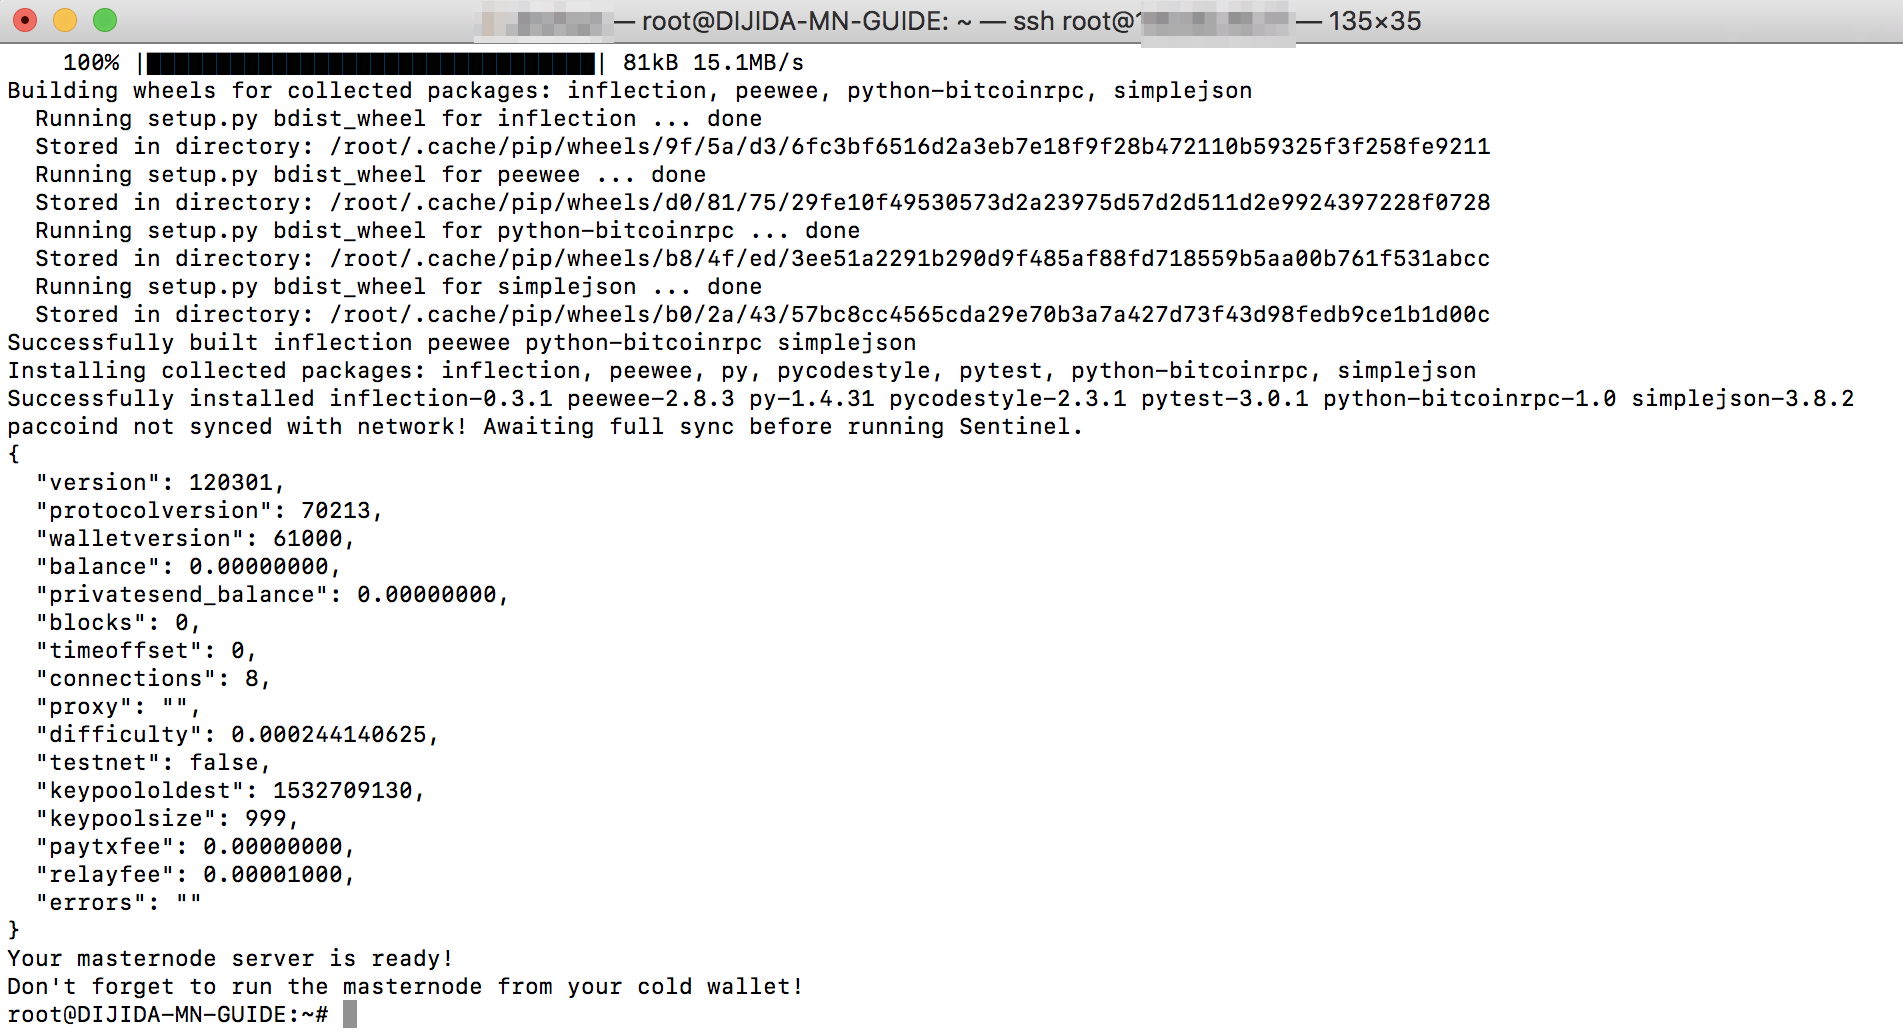
At the very end you should see a message indicating that your $Pac MN and Sentinel has been successfully installed.
Install $Pac MN Service
Next we will add an entry into systemd which will do two very important things:
-
Autostart your $Pac Masternode process
paccoindwhen your VPS boots up (or reboots). This rarely happens, but it can happen if there are issues on the Vultr side with their hosting equipment. -
Restart your
paccoindimmediately if the process fails for whatever reason. This is also rare, but better safe than sorry.
Note This script is from foxD one of the $Pac developers. Give him a huge thanks on Discord!
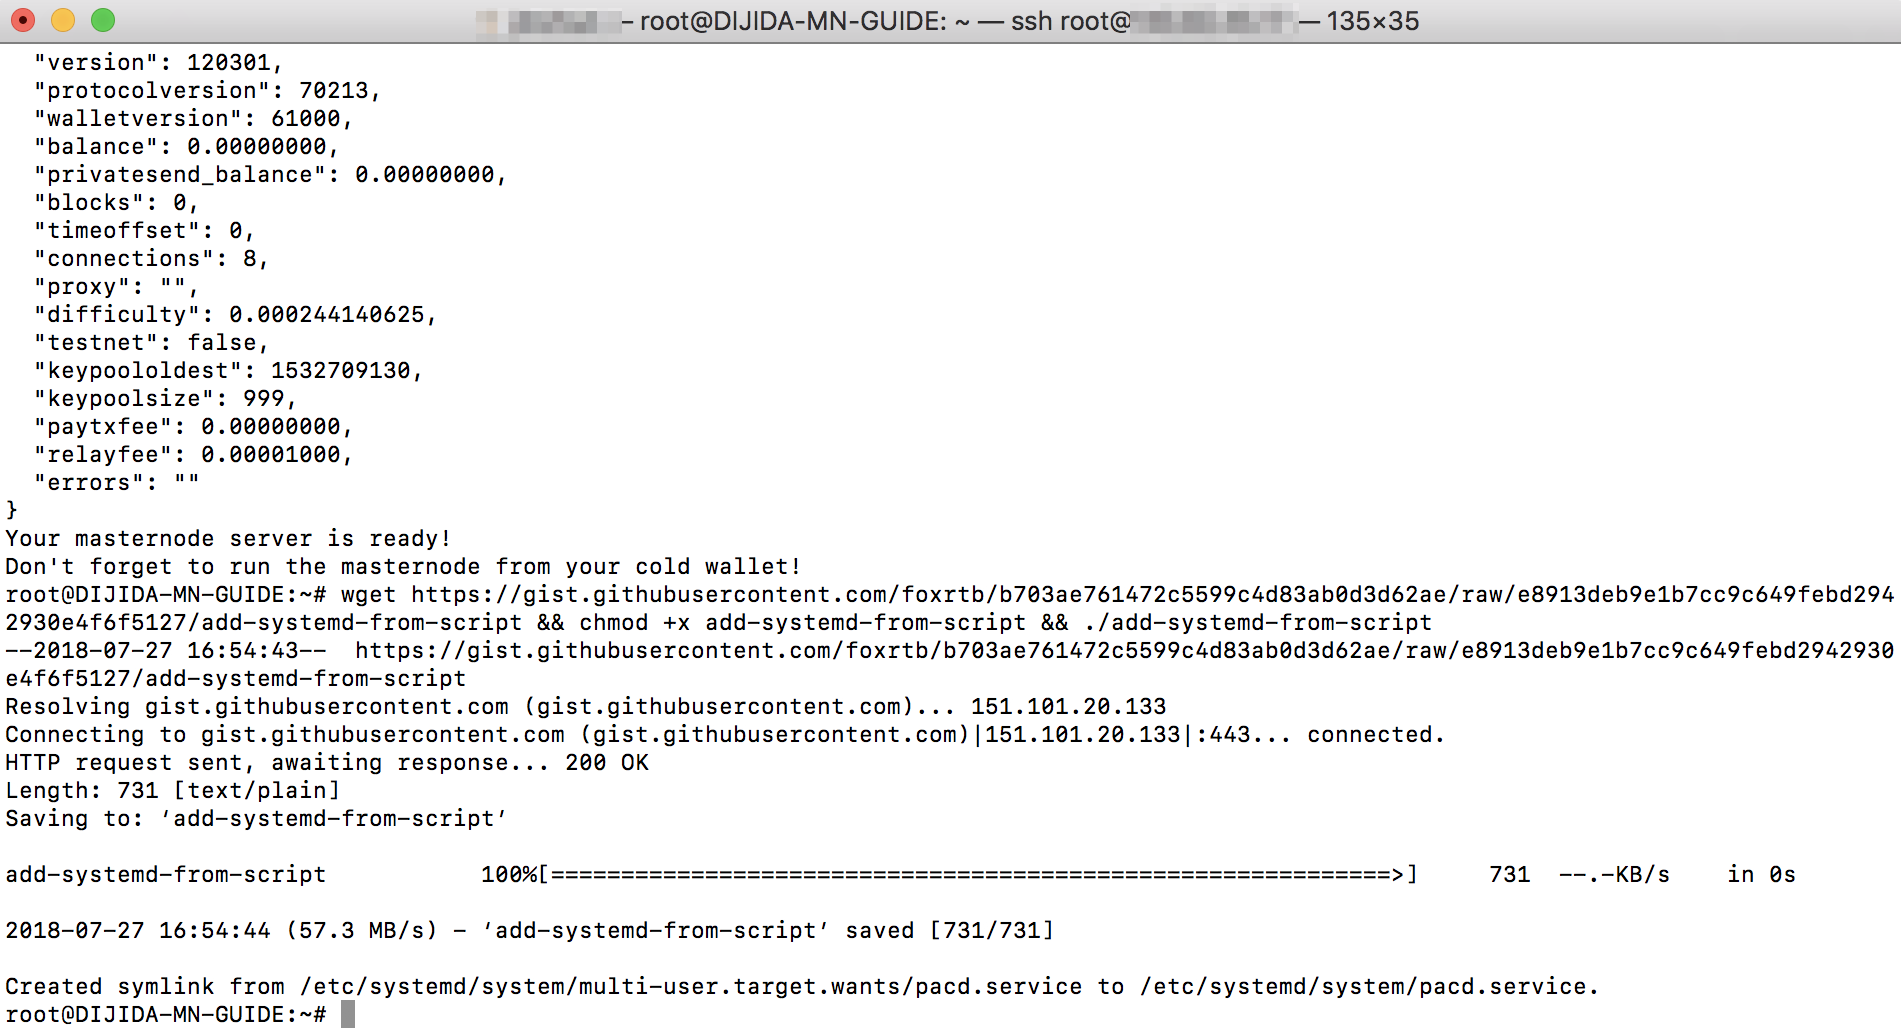
sudo wget https://gist.githubusercontent.com/foxrtb/b703ae761472c5599c4d83ab0d3d62ae/raw/e8913deb9e1b7cc9c649febd2942930e4f6f5127/add-systemd-from-script && chmod +x add-systemd-from-script && ./add-systemd-from-script
If you used the copy icon, you can simply paste using Ctrl+V (for Windows) or Command+V (for Mac) into your ssh client. Otherwise press enter to continue. You should see something similar to the screen shot below:
Verify Synchronization
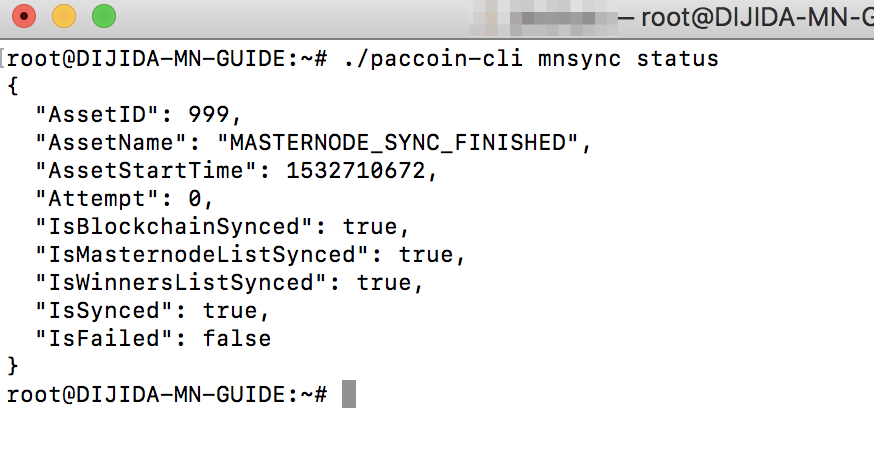
Before our Masternode can be remotely started from our desktop wallet, we want our MN’s local blockchain, masternode list, governance objects, etc, to be fully synchronized with the $Pac network. To do this, execute the following command and wait until the “AssetId” field shows 999 as in the screen shot. This can take 10 - 15 minutes. To check again, simply press the ‘UP’ arrow to display the previous command and hit enter.
./paccoin-cli mnsync status
If you used the copy icon, you can simply paste using Ctrl+V (for Windows) or Command+V (for Mac) into your ssh client. Otherwise press enter to continue. You should see something similar to the screen shot below when your MN is fully synched:
Next Step: Start Your Masternode
Now that the Masternode software is installed, the next step is to Start the Masternode so it’s visible on the $Pac network.
