These Instructions Are ONLY for hosting your masternode on Ubuntu 16.0.4. Although some masternode users have successfully used other Linux distros/versions (e.g. Debian, Ubuntu 18) and even Windows, this guide is only meant to work with Ubuntu 16.
Going through this guide for the first time should take around 30 minutes to an hour. If you have already set up a masternode, you can use the quick One Page Guide.
How to Use this Guide
Hosting your own Masternode (MN) can be a rewarding experience for those wanting to grow their investment in $Pac. At the same time, MN hosting may be too complicated for some. This guide has been simplified as much as possible, but if it seems too daunting or intimidating, there are alternatives to hosting your own $Pac MN.
Shared Masternode services allow investors without the full amount of collateral needed for an MN (500K $Pac) to pool resources with other investors into a shared MN. There are a few shared MN services out there, and one that I would recommend is Pacnode.net.

Pacnode has one of the best interfaces and services for the casual investor and is constantly innovating new features into their service. These shared MN services charge a percentage fee for hosting and may be a better option for you. I DO NOT HAVE a vested interest in Pacnode, I just know a lot of investors that are happy with the service.
Now that you’re ready to jump into the exciting world of Masternodes, here is a quick overview:
Steps to create your Master Node
- Getting Ready
- Configure your Desktop Wallet
- Install Masternode Server on Your VPS
- Start Your Masternode
- Monitor your Masternode and Collect Rewards
As we go along, you will notice some guideposts along the way including:
Steps that are important to follow in order:
- 1. Step 1
- 2. Step 2
Call outs for typing in commands:
type this exact command or use copy to clipboard
icon directly below
Click the copy button above (directly below the command) to copy to your clipboard for easy copy/paste into your ssh program (see below):
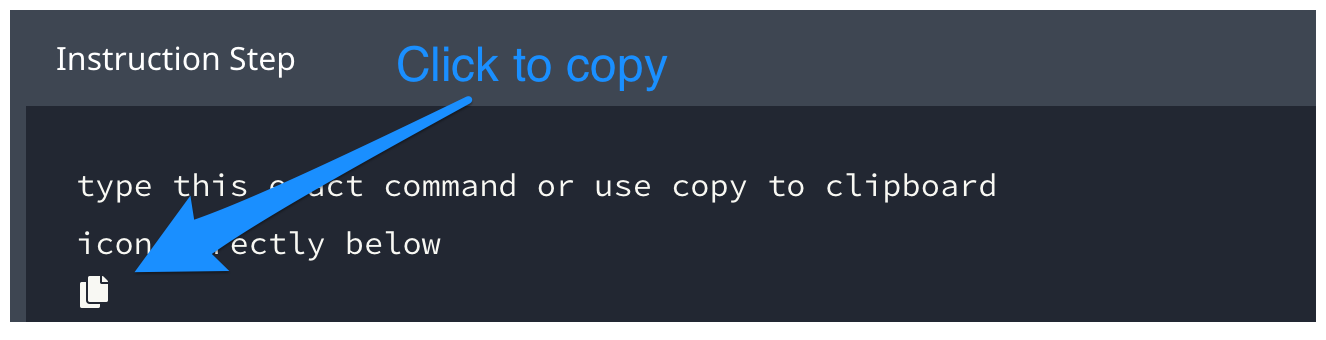
This will also include the new line character for convenience (so you don’t have to press enter after pasting using this method).
To paste after copying using for Windows: Ctrl+V and for Mac: Command+V.
Warnings and Gotchas: are displayed in yellow callouts as shown below.
Pay extra attention!
Text Editor
Before starting, get your favorite standby text editor ready to go. This part will save you a lot of time as you can copy/paste instead of typing commands in directly. If you are on Windows, you can use the built in Notepad program. For Mac, you can use the Notes application. Some good alternatives that are free for both Windows and OSX include:
- Visual Studio Code (used to create this site)
- Atom
- Sublime
Basic $Pac Network Overview
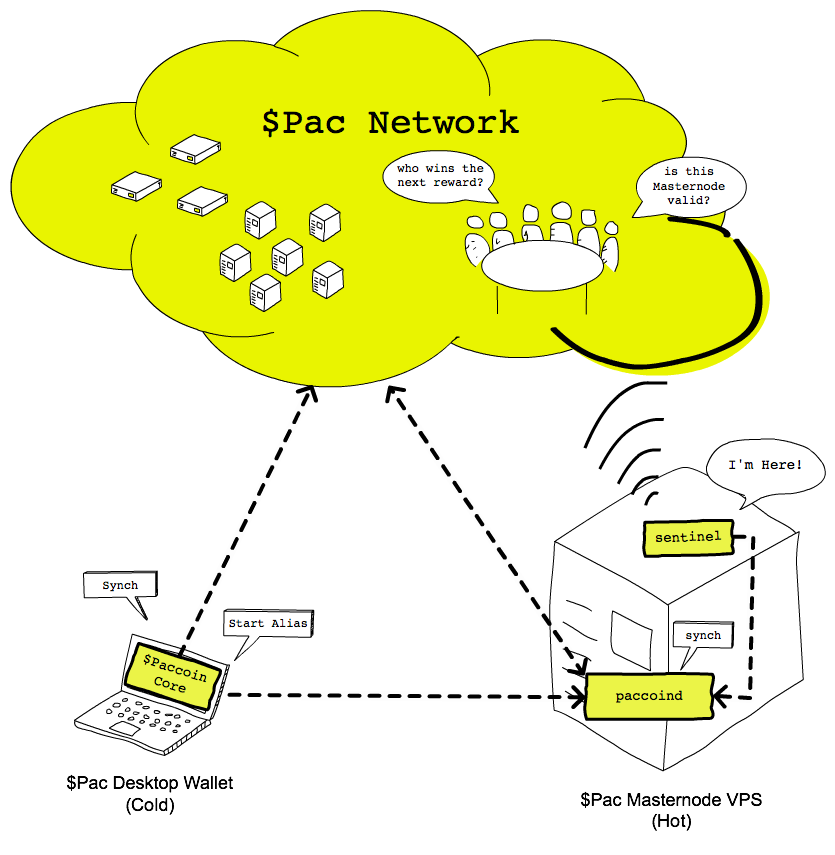
There are 2 separate parts to a Masternode setup: Your Cold Wallet (installed on desktop) and your Hot Wallet (installed on server). In this guide, we will be using "cold" and "desktop" interchangeably, as well as "hot" and "MN/server" as shown below.
For the purposes of this guide, there are 3 main components of the $PAC Masternode Network that are important (this is not meant to be an exhaustive explanation of how the network is constructed. If you need more information, you can Google it).
-
Desktop with $PAC Wallet installed (also known as the cold wallet): This is the main $PAC wallet, where you can send and receive $Pac, where the 500K $PAC collateral will be stored, as well as remotely starting your Masternode and broadcasting its address and collateral id onto the $PAC Network.
-
VPS with $Pac Masternode software and Sentinel installed (also known as the hot wallet): This is where the $Pac MN process
paccoindparticipates in the second tier of the $Pac network, supporting instant sends (instantPac). It is also where thesentinelprogram resides, which periodically broadcasts your MN presence to other Masternodes. -
$Pac Network: This is where the core nodes and all of the other $Pac Masternodes reside. Both your desktop as well as your Masternode connect to the network to syncrhonize their copies of the $Pac blockchain and, importantly, this is where your Masternode gets validated. The network of $Pac MNs also decides which MN will receive the next block reward.
Communicating with your hosted MN Server
SSH Client
SSH is a secure network protocol for communicating with your remote Masternode server. If you are using Mac OSX as your desktop wallet, then you already have an ssh client installed via the terminal application. If you are on Windows, you can download the free and opensource Putty program. Another good Windows ssh client is Bitvise (thanks Artsy!). Once downloaded and installed, proceed to the next step.
Generating SSH Keys
Configuring SSH keys for your local desktop machine will save time as you can export your public key to your MN server and only remember a single password instead of having to type the password to your remote server every time you login.
Mac OSX
Follow this link from the github help docs for instructions on generating a new ssh key pair.
Once you’ve followed those steps, then:
- 1. Execute the command below to copy your newly generated public key onto the clipboard:
pbcopy < ~/.ssh/id_rsa.pub
and then
- 2. Paste them into your text editor (Command-V).
Windows
Easy Instructions from the Joyent docs for configuring a new ssh key pair for Putty. If you are using Bitvise, easy instructions are found here.
Follow all of the steps including step 8. Now that your public key is copied to the clipboard, paste it into your text editor from the previous step (Ctrl+V).
We'll be using the public ssh key you just generated above when we deploy our virtual private server to install the Masternode software. Be sure to follow the steps and paste the public key into your text editor to have it ready to go.
Next Step: Configure Desktop Wallet
You now have a text editor, ssh environment, and (optionally) ssh key pair generated. We’re ready to Configure the desktop cold wallet which will be used to collateralize and remote start the Masternode server.
If you find yourself stuck, the $Pac community is always there to help. You can find the support channel on the $Pac Official Discord as well as the $Pac Masternodes Group in the link below.
